Introduction
Welcome! pianoscope turns your iPhone or iPad into the ultimate assistant for creating high-quality piano tunings.
In this manual we explain the basic operation of the app and all its features. We assume that you already know how to tune pianos.
| The tuning of pianos is not witchcraft. Nevertheless, you need some basic knowledge, skills and the right tools for the job. So be careful. We are not liable for damage to your instruments. |
The screenshots in the following chapters show pianoscope on the iPhone. But all functions are equally available on the iPad. The app is optimized for landscape format on the iPhone. However, all views also work in portrait mode. There is no preferred orientation on the iPad.
Download, Trial Period and Purchase
System Requirements
pianoscope requires an iPhone or iPad with at least iOS 15.
Download
You download the app via the Apple App Store onto your iPad or iPhone. The mere download is free of charge. Via this link you can quickly and easily access pianoscope in the App Store.
Trial and Purchase Options
On the first start the In-App Purchases panel appears with the options to test and buy pianoscope.

Free 14-Day Trial
You can try out all functions for 14 days free of charge without any obligations. To start your free trial, select the option Start Trial in the first block. You may then be prompted by the system to enter your app store password. This is required to record when you started the trial period.
When the 14 days have expired, you will still be able to open and view all the tuning documents created during this time, but you will no longer be able to edit them or tune any instruments with them. To continue using the application to its full potential, you must purchase the standard or pro edition.
Standard Edition
pianoscope standard contains all basic functions for tuning pianos. It is suitable for all pianists who would like to create high-quality tunings themselves.
Pro Edition
pianoscope pro comes with additional features for professional piano tuners like custom tuning styles, graphical tuning curves, partial tone weights, extra stretching or automated pitch raising.
Purchase
To purchase one of the editions, select the Buy button in the corresponding block. After that the system will ask you for your password or fingerprint, depending on the device, to authorize the purchase. Once the purchase is successful, it will be confirmed with a red checkmark on the corresponding block. Now select the Done button in the upper right corner and start with your first tuning. The prices displayed may differ depending on the country and currency.
Upgrade to the Pro Edition
If you are unsure whether you need the features of the pro edition, you can purchase the standard edition first and upgrade to the pro edition at any time later at a reduced price.
Subscribe to the Pro Edition
As an alternative to a one-time purchase, you can also obtain the Pro Edition as a monthly or annual subscription. To subscribe, select the Subscribe button in the appropriate block. Again, depending on the device, the system will ask you for your password or fingerprint to authorize the subscription. If successful, this will be confirmed with a red check mark on the corresponding block.
As long as you do not cancel a subscription, it will automatically renew after the selected period. Via the button Manage subscription you can cancel the subscription at any time or switch between the different periods.
Restore Purchases
If you have already purchased pianoscope, you can reinstall it anytime or install it on another device. After installation, simply select the option Restore Purchases below the last block. You may now have to enter your app store password. Afterwards, the functions you have already purchased will be unlocked.
Open via Menu
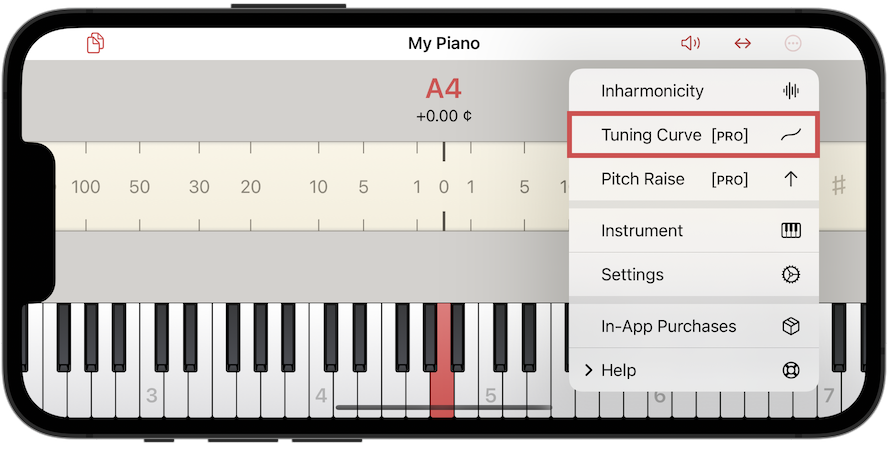
The first time you start pianoscope the purchase dialog appears automatically. You can display it again later by selecting In-App Purchases from the  menu.
menu.

Tuning Documents
The settings required for tuning an instrument are saved in a so-called tuning document. For each piano that you want to tune with pianoscope you create such a document.
Creating A New Document
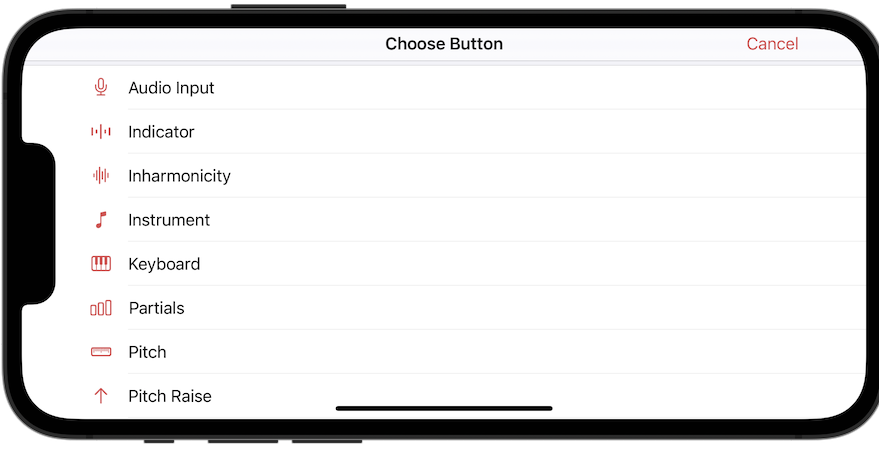
When you start pianoscope for the first time, the document browser appears as you know it from other apps like Pages or Numbers. To create a new document, tap on the plus symbol in the upper right corner:
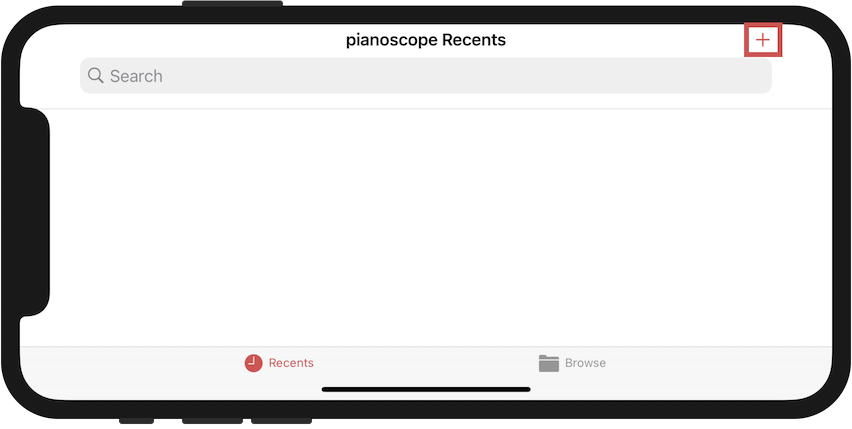
In the following panel you can define the basic settings for the new document. You can exit at any time by tapping on Cancel in the upper left corner.

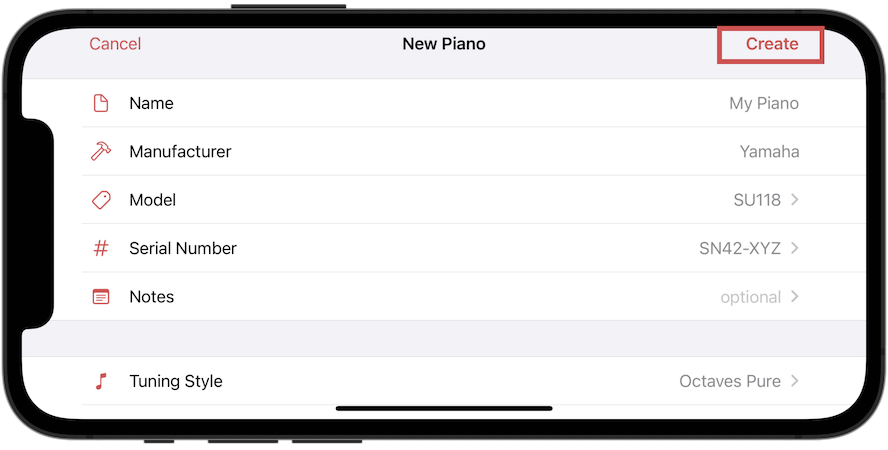
Manufacturer, Model & Serial Number (pro)
In pianoscope pro you can enter additional information such as the manufacturer, the model name or the serial number of an instrument. However, you may also leave these fields empty.

Notes (pro)
You can enter additional information about an instrument in pianoscope pro under Notes. To do so, tap on the row named Notes and enter any text in the following dialog. You finish the input by tapping on the back arrow in the upper left corner.


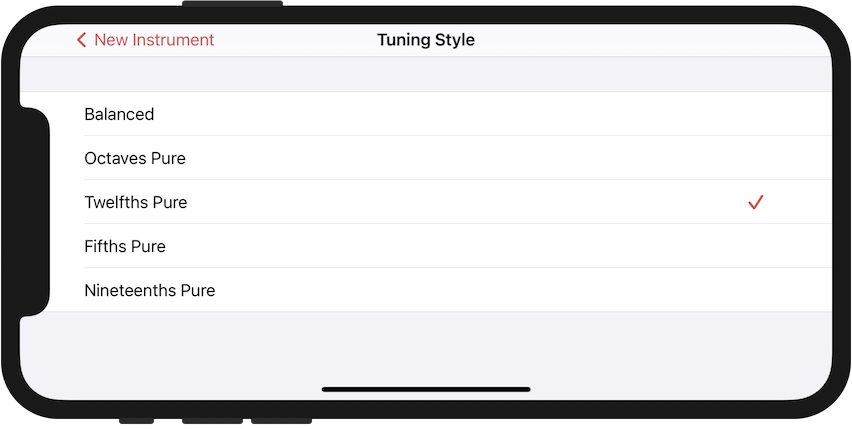
Tuning Style
By choosing the tuning style you determine which slow-beating intervals pianoscope should tune as pure as possible. The following styles are available:
-
Balanced
-
Octaves Pure
-
Twelfths Pure
-
Fifths Pure
-
Nineteenths Pure
The default setting Balanced strives for a balance of as pure octaves and twelfths as possible.
| The pianoscope’s tuning algorithm searches for an individual, preferably optimal solution for an instrument. However, even the preferred intervals are never completely pure, but always slightly tempered. This is due to the nature of the equal temperament and the inharmonicity of the piano. The preferred intervals, however, are much purer than the non-preferred ones. |
To select a different tuning style, tap on the corresponding row. In the following dialog, select the row with the desired style and then tap the back arrow in the upper left corner.
| In the Pro-Edition of pianoscope you can assign even finer weights to intervals and check the resulting deviations in detail. See Tuning Curve. |
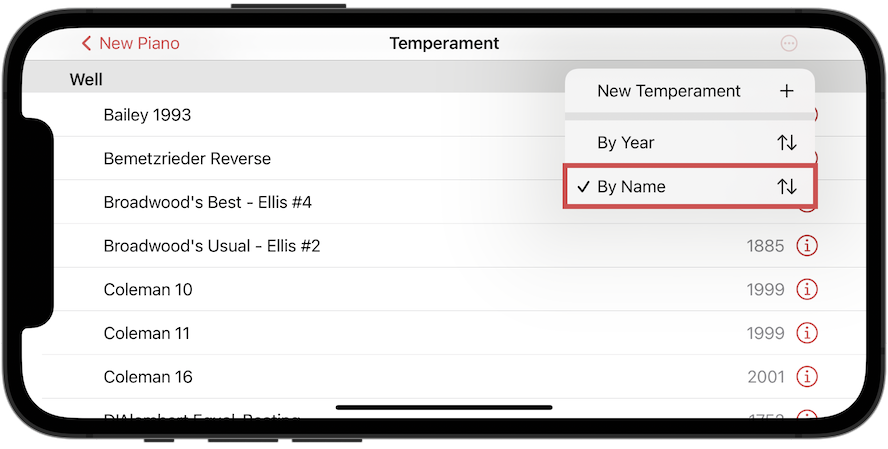
Temperament

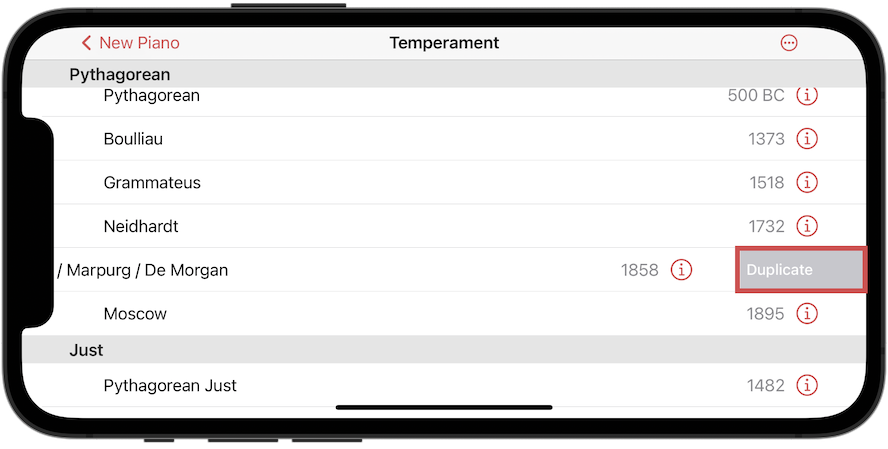
By default, pianoscope uses an equal temperament to calculate the tuning curve. If you want to use a different one, tap on the line Temperament. In the following dialog you can select one of about 70 common temperaments from older and more recent history or create your own.

The offered temperaments are divided into the following categories:
- Pythagorean
-
These temperaments prefer pure fifths.
- Just
-
These favor pure fifths and thirds.
- Meantone
-
These temperaments favor pure thirds and are playable in eight keys.
- Meantone Modified
-
Mitigated wolf intervals allow to play in nine keys.
- Well
-
These temperaments can be played with colorations in all keys.
- Quasi Equal
-
Historical temperaments that approach the equal temperament without reaching it exactly.
By default, the temperaments are sorted by the year of their publication within their categories. However, you can also sort them by name using the menu.
If you swipe down further at the top of the list, a search field appears. Enter a search term to reduce the content of the list accordingly.
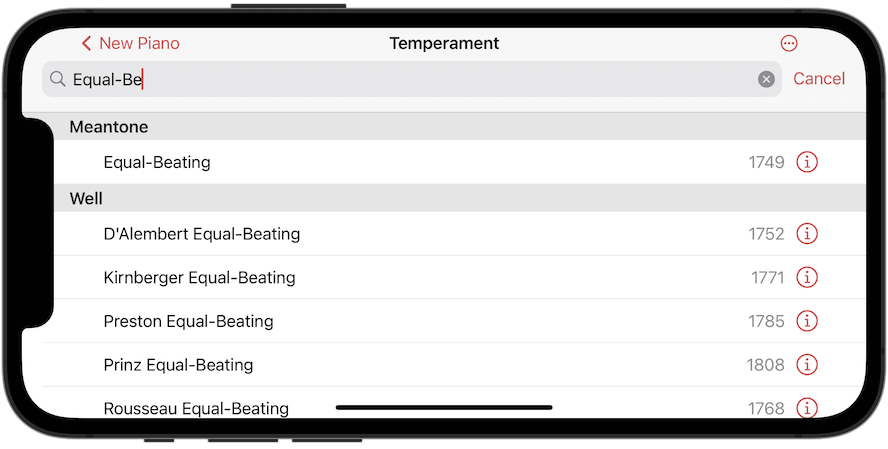
To select a temperament, simply tap on the corresponding line. Your selection will be indicated by a red check mark.

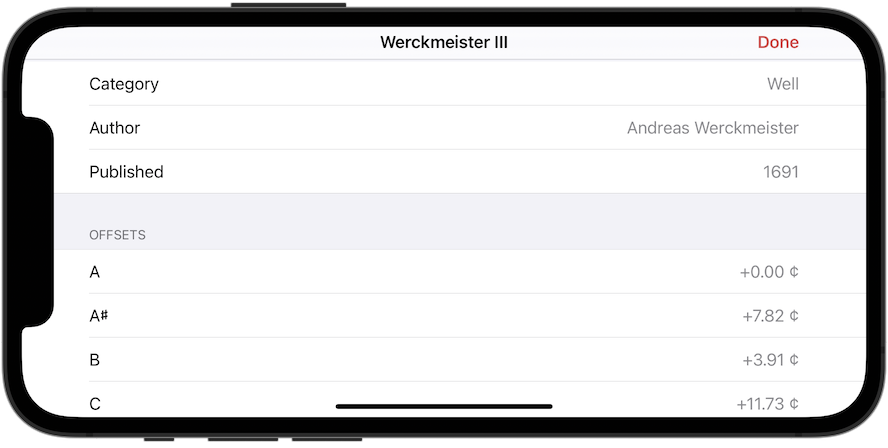
If you are interested in the details of a temperament, tap the information icon at the end of a line. The following dialog contains the offsets that pianoscope uses when calculating the tuning curve with this temperament.
Custom Temperaments (pro)
If you want to create your own temperament, there are two ways to do this:
Either select the New Temperament item in the menu to create a temperament in which all offsets are initially set to 0 cents.

Or swipe left on the row of an existing temperament and select the Duplicate item to create a copy whose offsets you can then modify.
Assign a name for your new temperament in the following detail dialog. The name must not be the same as for an existing temperament.

To assign an offset, tap on the row of a note. In the dialog that appears, you can now set the desired cent amount and then use the arrow keys in the upper right corner to conveniently switch to the next note.

When you have assigned all offsets, tap on the back arrow in the upper left corner. Your new temperament will now appear at the top end of the list under the Custom category.

To delete your custom temperament, swipe to the left on the corresponding row and select the item Delete.

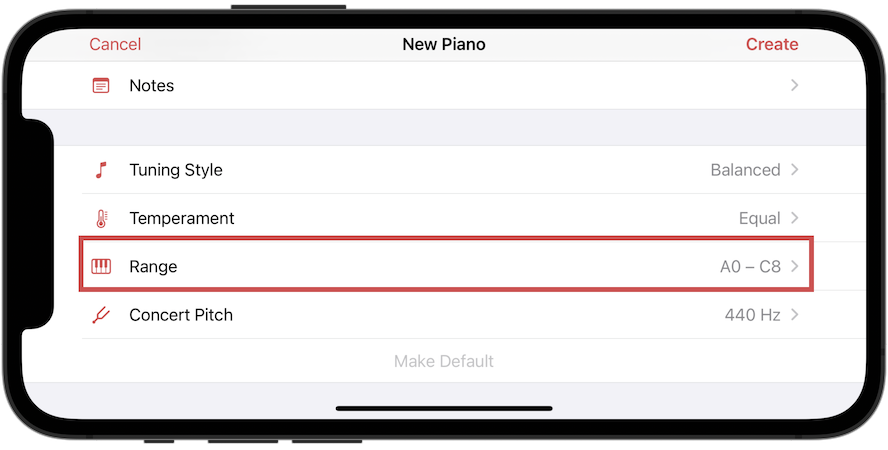
Range
You can also use pianoscope to tune instruments such as harpsichords and spinets, which have a much smaller range than regular pianos. To do this, select the lowest and highest note of their compass. pianoscope will then consider only the notes from this range in all calculations and in all views.

Extended Bass Notes (pro)
Some instruments have additional bass notes below A0, such as some Bösendorfer concert grands. With pianoscope pro you can also tune these notes by selecting the lowest note here.

Concert Pitch
Here you define the frequency to which the concert pitch A4 should be tuned. Around this tone, pianoscope calculates the individual tuning for the instrument.
The default value is 440 Hz. To change it, tap on the concert pitch row. In the following dialog, you can select a frequency between 370 Hz and 524 Hz with up to two decimal places by turning the selection wheels on the left. Alternatively, you can use the selection wheels on the right to specify the offset from the 440 Hz default concert pitch in cents.

Measure
If you want to analyze or adopt the current concert pitch of an instrument, open the menu in the upper right corner and select the item Measure.

pianoscope now asks you to play the note A4 on the instrument. If its unison is very out of tune, you should opt for one of the strings and dampen the others. The app now analyzes the played note and adopts its pitch.
Optimize (pro)
The Optimize function allows you to determine from the current tuning state of an instrument an optimal concert pitch that requires a minimum of pitch changes.
Depending on the situation, this function works in three different ways:
-
If you are just setting up a document for a new instrument, the inharmonicity is not yet measured. In this case, the Optimize function opens the inharmonicity dialog, and you can perform the entire measurement right here. The optimum concert pitch is then determined from the pitches measured in the process.

| Unlike with the pure inharmonicity measurement, you can also play notes above C7 here. These do not play a role for the inharmonicity, but are used to optimize the concert pitch. |
-
If the inharmonicity has been measured recently in an existing document, the Optimize function opens a dialog. There, select Use existing measurement to determine the optimal concert pitch from the pitches of the inharmonicity measurement. To measure them separately, select Make new measurement. The further steps are the same as in point 3.

-
If your document contains only an older measurement, a dialog will appear asking you to measure some notes. The procedure is similar to measuring inharmonicity. Follow the prompts and play the red marked notes of the A minor triad one after the other, each for one second, until they have turned green. After that, pianoscope will automatically adjust the concert pitch.

| You do not have to strictly follow the suggested notes of the A minor triad when measuring pitches. pianoscope weights all measured notes equally when optimizing the concert pitch. You can thus give more weight to a range by measuring more notes there than in other ranges. |
| The Optimize function is not useful to determine the concert pitch for instruments that are strongly out of tune. In these cases, select the concert pitch manually and then use the pitch raise function. |
Reset
Using the menu, you can also reset the concert pitch to 440 Hz or to the value you have made the default.

Make Default (pro)
If you frequently tune instruments in the same way, you can make your settings the default for new documents. To do this, simply set the desired values for the concert pitch, tuning style, temperament, and range, and then tap the Make Default button. From now on, new documents will automatically receive these settings.

Finalizing The Settings
When you are satisfied with all settings, tap the Create button in the upper right corner. This creates a new document with the selected settings.
The document will then open automatically and you will be taken to the Tuning View.
Managing Documents
To reopen the document browser, tap the documents icon in the upper left corner of the toolbar.

In the upcoming view you can manage existing documents. To open a document, simply tap on a document icon. To rename, move, duplicate and delete, tap and hold a document icon.
Folders can be created using the menu in the upper right corner.

Cloud Storage
If you want to use the same documents on multiple iPhones and iPads, you can create them in a cloud storage such as iCloud Drive. To do this, tap the back arrow in the top left corner twice and then select the row named iCloud Drive. You can also move existing documents there.

| If you install the apps of third party cloud providers like Dropbox or Box.com, you can also use their storage locations with pianoscope. |
Measuring Inharmonicity
For The First Tuning
Before pianoscope can calculate a tuning for a piano, it must know the inharmonicity of all strings and the relative intensities of the most important partials. You measure both in the inharmonicity view when you tune an instrument for the first time. If no measurement is available yet, the tuning view will ask you to perform it.

Opening Via Menu
If you have already measured the inharmonicity before, you can open the corresponding view via the Inharmonicity item in the menu.
| The results of the inharmonicity measurement are saved in the tuning document, so that you do not have to measure again for further tunings of the same instrument. |
Measurement Procedure
By default, pianoscope prepares a measurement for fine tuning and asks you to play all notes from A0 to C7 for one second each. The range to be played is grayed out on the keyboard.

However, if you only want to tune an instrument coarsely, tap the Fine Tuning button and switch to a Coarse Tuning in the appearing menu.

pianoscope will now mark only all As and Es of the first six octaves for the coarse measurement.

A coarse tuning saves you time because you only measure a sample of notes, from which pianoscope automatically creates a model for all other notes. A coarse measurement does not fully reflect the characteristics of an instrument, especially in the bass range, but it is sufficient for many purposes.
If you often start with coarse tunings, you can also make this setting the default for new documents in the pro edition of pianoscope. To do this, tap the Coarse tuning button again and select Make Default in the menu that appears.

The following measurement procedure is the same for fine and coarse tunings.
Play the first tone A0 and hold it for one second. While the tone sounds, the current key slowly fills with green color.

If the whole key is green, the measurement was successful and pianoscope asks you to play the next key.

For each successful measurement a point is drawn in the chart. The higher up a point is drawn, the greater the inharmonicity. The horizontal grey lines represent a factor of ten.
| If a key is out of tune by more than 50 cents, pianoscope can no longer automatically recognize which note it is. In this case you have to switch off the Automatic Key Selection via the toolbar and select the key to be measured by tapping on the screen - if it is not already selected. |
| If a unison is significantly out of tune, you should only let a single string sound and mute the others to get more accurate results. You can, however, measure slightly out-of-tune unisons as a whole and will obtain an average value for the inharmonicity. This can even be advantageous for the calculating of the tuning. |
After you have measured the first two notes, pianoscope calculates the expected idealized progression of inharmonicity for all keys. The more notes you measure, the more accurately the displayed curve reflects the reality of the instrument.

You can interrupt a measurement at any time by pressing the pause icon in the function bar at the top left. To resume, press the switch again.
While measuring the inharmonicity of a string, pianoscope simultaneously determines the relative intensity of each of the first ten partials. However, the values measured in this process are not displayed in the inharmonicity view, but appear as color gradients of the Deviation Curves in the Tuning Curve View.
If you have decided on a coarse measurement, you can play any other notes in addition to the required notes at any time. You also do not have to adhere to the order specified by pianoscope. In this example, the bass range was measured more finely, but the tenor and treble were only measured with samples.

You do not need to measure the high treble above C7, since the position of the partials there is irrelevant for the calculation of the tuning.
Repeating Measurement Of Outliers
You can repeat the measurement of a note at any time, even if pianoscope already asks you to play the next one. If the displayed inharmonicity of a note strongly deviates from the idealized curve, it may be due to a poorly balanced piano or an incorrect measurement, for example because of a disturbing background noise. Repeat the measurement when pianoscope prompts you as in this example.
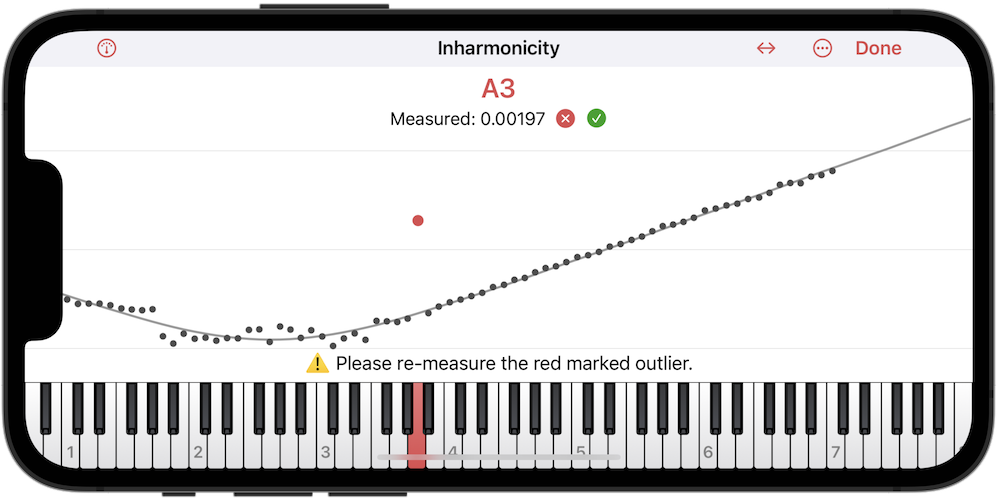
It may happen that a value is marked as an outlier, which you however consider to be correct. In this case, select the value and tap the green check mark so that pianoscope accepts it permanently.
Deleting A Measured Point
When the measurement is stopped, you can select individual points by tapping and delete them with the red X. If you hold your finger on the X for a longer time, a menu appears that allows you to delete all measured values at once.
Ending The Measurement
When you have recorded all the required tones and you are satisfied with the result, tap the Done button in the upper right corner to return to the Tuning View.

Pitch Display (pro)
While measuring the inharmonicities, pianoscope also simultaneously determines the current pitches. To show these, simply swipe upwards or downwards in the diagram.

After a tuning, the actual pitches of the already tuned strings also appear in this display.
Swipe again to return to the inharmonicity display. During the measurements, you can switch back and forth between the two views as desired.
Curve Settings
From the inharmonicity values of the measured notes pianoscope constructs an idealized curve from which it derives the inharmonicities of the other keys. For the measured notes it directly uses the measured values by default. Via the menu you can display the resulting curve that pianoscope will use for the calculation of the tuning.

If the measured inharmonicities contain many jumps, the Tuning Curve calculated by pianoscope will also contain discontinuities which reflect the characteristics of the instrument. If you prefer smoother tuning curves, pianoscope can alternatively use a weighted average of measured and idealized inharmonicities. To do this, select the Weighting item in the menu. In the following dialog you can use the slider to set the desired weighting.

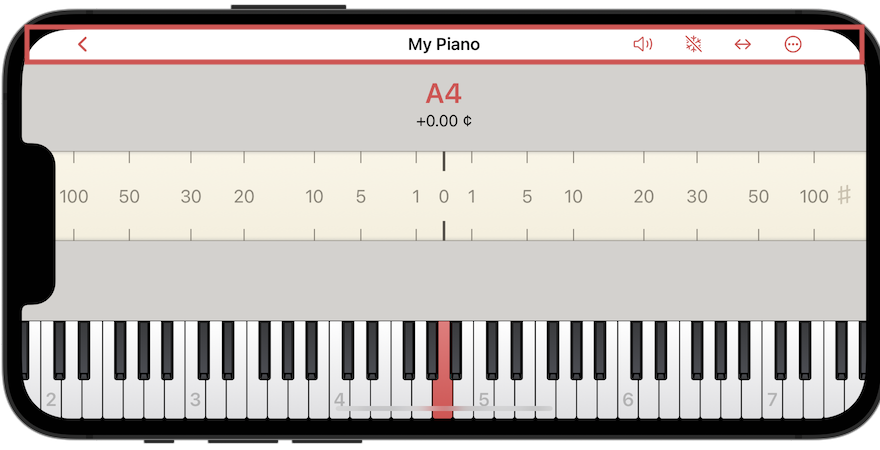
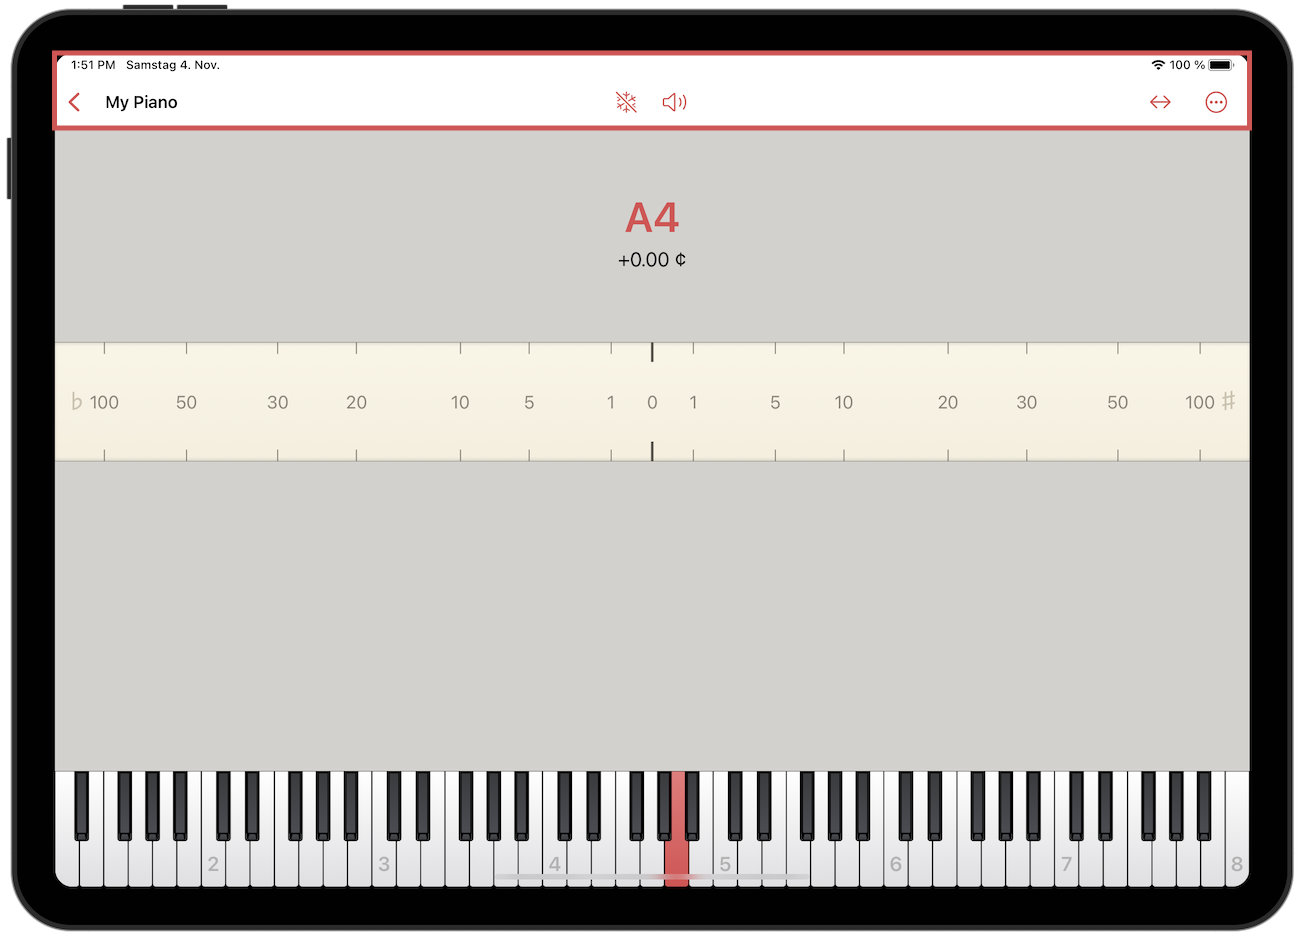
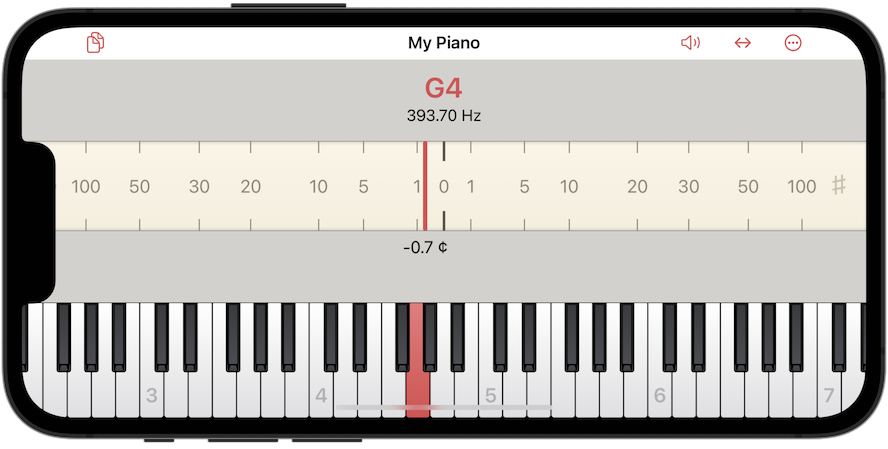
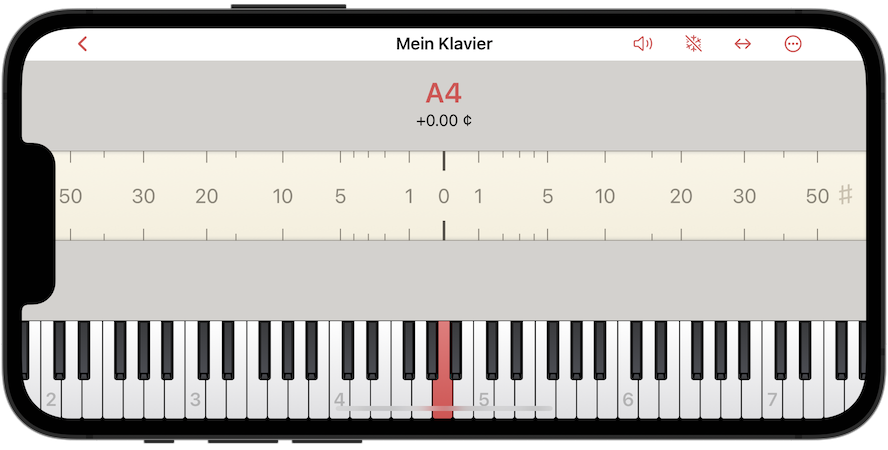
Tuning View
This view helps you to transfer the tuning computed by pianoscope to the instrument. It automatically recognizes which key you are playing and displays how far the pitch of the currently sounding string is from its calculated target.

-
Returning to the management of tuning documents
-
Name of the current tuning document
-
Switch for indicator freezing (pro)
-
Switch for Tone Generation (pro)
-
Mode for Automatic Key Selection
-
Main menu
-
Name of the selected key
-
Calculated target pitch for the selected key, as deviation in cents from a harmonic pitch.
-
Scale with indicator showing the deviation of the currently sounding tone from its target pitch in cents
-
The Strobe showing the deviation from the target pitch by its movement
-
Text representation of the deviation of the currently sounding tone from the target pitch in cents
-
Selected key
Automatic Key Selection
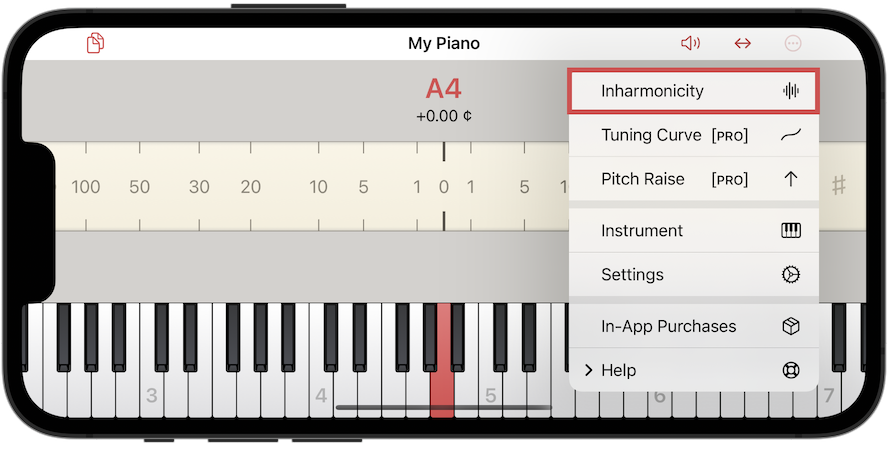
By default pianoscope recognizes which note you are playing and automatically selects the corresponding key in the tuning view. However, this is not always desirable. Therefore pianoscope offers different settings. The second symbol from the right in the toolbar indicates the currently active mode for the automatic key selection. When you tap on the icon, a menu appears that allows you to change this setting.
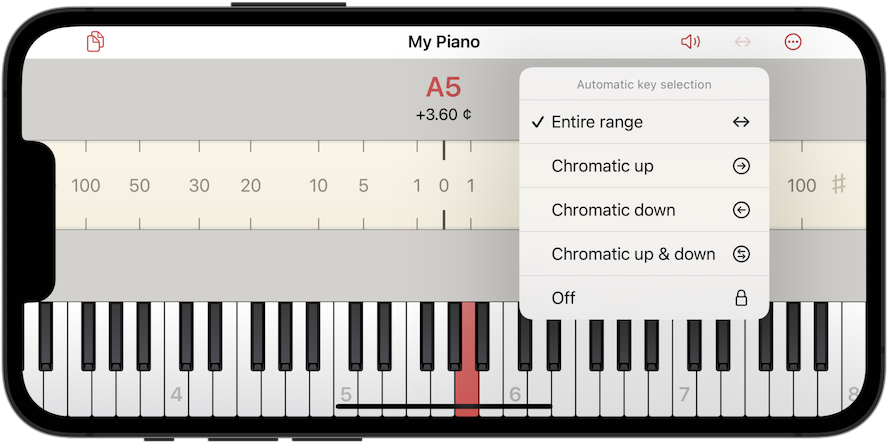
- Entire range
-
The selection is changed automatically with every detected note.
- Chromatic up
-
Changes selection only if the played note is one semitone above the currently selected key.
- Chromatic down
-
Changes selection only if the played note is one semitone below the currently selected key.
- Chromatic up & down
-
Only changes if the played tone is one semitone above or below the currently selected key.
- Off
-
The selection is never changed automatically, but only by tapping the on-screen keyboard.
The chromatic settings are useful if you like to use other notes for comparison while tuning. They can also prevent the selection from skipping when there is background noise.
In all of the settings you can always directly change the selection by tapping the on-screen keyboard.
| You can also switch to an adjacent key a semitone higher or lower by tapping the left or right part of the scale. When you swipe, you change with an octave interval. |
| If a tone is more than 50 cents out of tune, the automatic key selection cannot work. In this case you must set it to off. |
Keyboard Size
You can freely change the size of the on-screen keyboard by pinching.
Indicator Display
The scale with the red pointer represents the deviation of the currently sounding tone from its target pitch in cents. The target - the zero - lies in the middle. If the indicator is to the left of it, the tone is flat; on the right it is sharp.

The scale is not linear: the closer the indicator is to the center, the more sensitive it is to pitch changes. In the area directly around zero, the resolution is better than 0.05 cents, in the outer area it is about 2 cents. If you also want a textual representation of the deviation, you can activate it in the Settings. It will then appear below the indicator.

Strobe
Via the Settings in the menu you can activate the strobe, which also shows the deviation of the currently sounding note from its target pitch. Its movement mimics the audible beats between two strings sounding simultaneously. If it runs to the left, the tone is too low. If it moves to the right, it is too high - the faster, the stronger. If it comes to rest, you have reached the tuning target. The movement can also be spotted from the corner of your eye, so you don’t have to permanently focus on the screen.

If you like it tidy, you can also display the stroboscope without scale and pointer. In this display you can purely focus on the movement of the strobe without distraction.
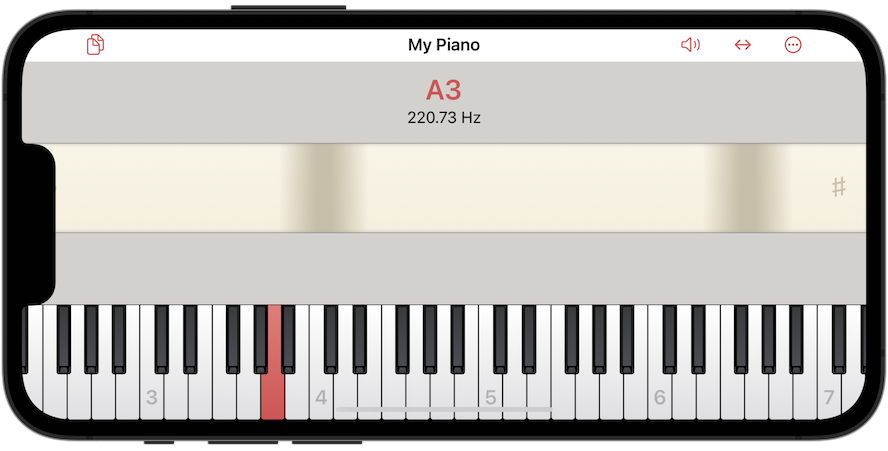
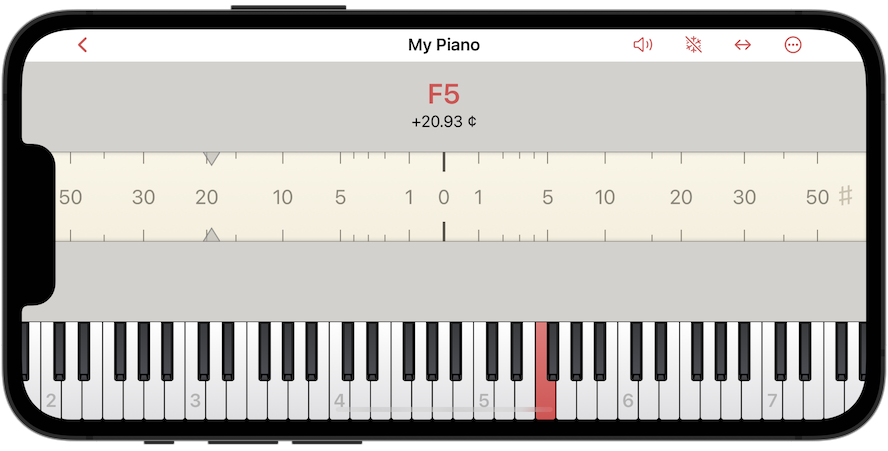
Checking the Concert Pitch
By default, the tuning view only shows the pitch of the currently sounding note when you play an A4. This is helpful to decide which concert pitch is appropriate for an instrument when starting a tuning. In the Settings you can activate the display of the current frequency for all other notes.

| If you want to get a complete picture of the current tuning of the entire instrument, you can also use the chart of the Pitch Raising View. |
Process of Tuning
| Before you start tuning, make sure that you have selected the right Tuning Style in the settings. |
| In pianoscope pro you can check and change the calculated Tuning Curve and the Deviation Curves of various intervals before tuning. |
| If the instrument is out of tune by more than 10 cents, it can be worthwhile to use the automatic Pitch Raising. |
Since pianoscope knows the inharmonicity of all strings and always calculates a complete tuning, you can tune the notes in any order. An exception is the automatic Pitch Raising, in which you have to work strictly from the bottom up.
For unison strings, you should tune a first string of the unison with pianoscope while the others are muted. The remaining strings should then be tuned by ear. Basically, with an accuracy of more than 0.01 cent, pianoscope is precise enough to allow you to tune the remaining unison strings via the display. However, you have more control over the sound and decay of a unison by using your hearing.
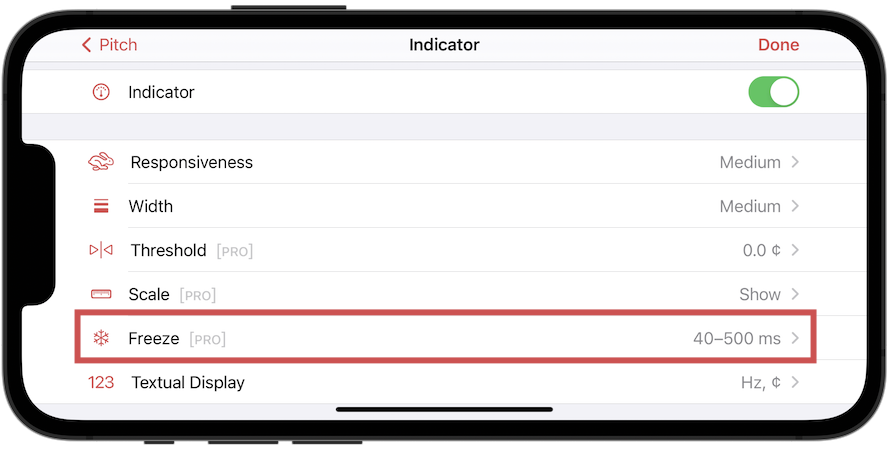
Indicator Freezing (pro)
The pitch of a piano tone is not always constant during its decay. In the midrange, it can fluctuate by a few cents depending on the force of the keystroke. In the treble, undamped and duplex strings also influence the perceived pitch and the display of pianoscope. As a piano tuner, you decide in such situations which sound phase of the note to focus on. In the midrange, it is common to use a later phase of the tone, for example, from 2 seconds after the strike. In this phase, the pitch variations are less pronounced between different keystroke strengths. Using your eyes, you then determine the center around which the red pointer or the stroboscope moves.
However, tuning according to this late phase does not necessarily lead to optimal tuning results, as it occurs less frequently in played music. Therefore, it is advisable to orient yourself to the pitches shortly after the strike, as our musical perception is particularly sensitive to the beginning of tones.
The Freeze function of the pianoscope allows you to do just that. It fixes the position of the red pointer at a defined time shortly after the strike with a gray line.

Depending on the register, the freeze time varies between 300 and 500 milliseconds.
You can activate the freezing of the indicator under Settings > Pitch > Freeze.

Use the Freeze function as follows:
-
Dampen all the strings of a unison except for the one you are currently tuning. Strike the note slowly and repeatedly as evenly as possible in mezzo forte. Focus exclusively on bringing the gray, freeze indicator to the zero position on the scale.

-
Tune all strings of a unison in this way.
-
In the high treble, place the device microphone as close as possible to the string being tuned to capture as little resonance from other undamped strings as possible.
-
In the high treble and in areas where the duplex scale resonates strongly, wait for fine-tuning between strikes until the resonances of the undamped strings have somewhat subsided.
-
In the settings for the textual display, you can determine whether the text remains on the frozen indicator, or whether it continues to move with the red line after freezing and displays the corresponding values.
| The concept of setting a measurement time for determining the pitch comes from the proven read-time feature of stand-alone electronic tuning devices. |
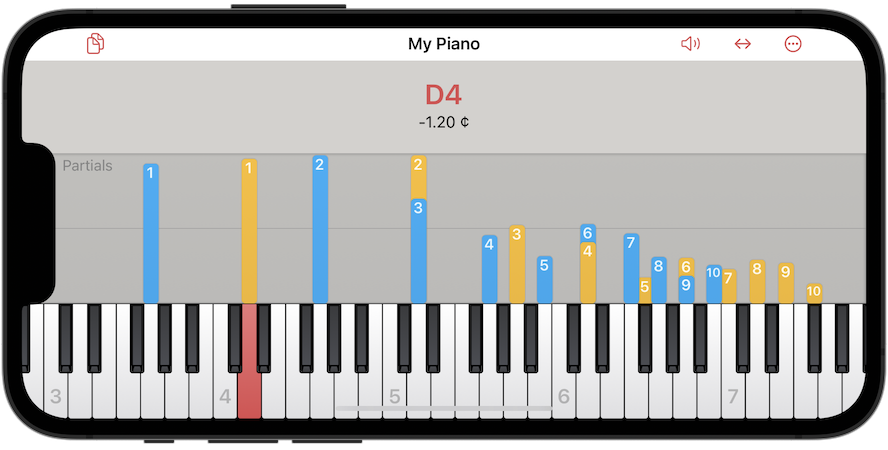
Partials (pro)
If required, you can additionally display the relative strengths of the first ten partials in the tuning view. You activate this via the General Settings.

Each of the orange bars shows a partial tone. The bar with the number 1 is for the fundamental and the numbers 2-10 for the respective overtones. The strengths of any other partials with higher numbers are not displayed. By default, the horizontal position of the bars represents the musical pitch of the partials. The vertical height, however, does not indicate absolute intensities, but only the relative strengths of the individual partials to each other.
Configuration
By tapping on the label Paritals you open a menu with settings of the partials view.

- Expected Values
-
The bars represent the strength of the partials they had when the inharmonicity was initially measured. If in a new tuning document you have not yet measured the inharmonicity, standard partial strengths of a typical instrument are assumed. If you activate the Tone Generator, pianoscope automatically switches to this mode and displays the partial tone spectrum of the generated tone.
- Continuous
-
The bar heights continuously represent the current strength of the partials.
- Hold
-
The bar heights are frozen at their respective maximum and remain there even after a note has decayed.
- Assign To Keys
-
By default, the partial tone bars are each assigned to a key on the keyboard based on their pitch. If you deactivate the menu item Assign To Keys, the partial bars will appear directly next to each other without being assigned to the keyboard keys.

| In the General Settings there are additional options for the partials view that are not included in this menu. |
| To increase the vertical range for the partials on small iPhones, you can shrink the keyboard by moving your thumb and index finger together (pinch gesture). |
Selecting partials
In the Expected Values and Hold settings, you can also select individual partials. To do this, tap on one of the orange bars. It will now be displayed in red, and its corresponding inharmonicity offset will appear in the upper right corner of the partial view. It indicates in cents how far away the selected partial is from a harmonic partial with the same number.

| It is not necessary to hit partial tone bars with low height exactly with your finger. You can also tap in the gray area above the bars to select them. |
When you tap a key on the keyboard to select a new note, the selected partial number is retained. This allows you to quickly compare the partial inharmonicities of different notes.
To get rid of the selection of a partial button, simply tap a selected bar again. Alternatively, you can also tap in the gray area next to the bar.
Intervals & Beats
If you select two notes on the on-screen keyboard, you can also visualize intervals in the partials view. To do this, tap and hold a key on the keyboard. This adds the held key as a second interval note. If you keep holding the finger, you can use a second finger to change the other note of the interval directly.
The partial bars of the second interval note are displayed in blue by pianoscope.

In this representation, it is easy to see which partial combinations coincide in an interval and can potentially produce beats. In the example image, these are the combinations 4:2, 6:3, 8:4 and 10:5, where the partials are each at the same musical pitch.
When you select the bar of such a partial collision, pianoscope displays the frequency of the expected beat in the upper right corner.

In the following section on aural training, you will learn how to make these beats audible as well.
Aural Training
The partial tone spectrum in pianoscope can also help you to train your hearing.
Tone Generator
If you activate the Tone Generator via the speaker symbol in the main toolbar, the partial view shows the spectrum of the generated tone. If you now tap on one of the bars, the tone generator plays only the selected partial. If you tap on the bar again, the complete tone with all partials is played again. By repeatedly switching between these two playback modes, you can easily train your hearing to identify a partial in a piano tone.
If you have selected an interval, the tone generator plays both notes of the interval. If you now tap a bar of a partial collision, the tone generator plays both partials involved. You will hear the same beating that will occur between the selected partials in the final tuning of this interval.
Recording & Filtering Partials
You can also use pianoscope to filter out the sound of individual partials from a real instrument. To do this, switch to the Hold setting. Now the partial tone bars are displayed even after a tone has decayed. If you now tap on one of the bars, pianoscope plays a recording of the respective partial over the loudspeaker of your device or a connected headphone.
Here, too, you can easily train your perception of the contribution of a partial tone to the overall sound by alternately tapping on different partials.
pianoscope can also help you to examine intervals of a real instrument for beats. To do this, you need to record the two notes of an interval one after the other as follows:
-
In Hold mode, play the first note of an interval on your instrument until the orange bars show the maximum of the partials.

-
Now double-tap in the dark gray area next to the partials. pianoscope now colors the bars of the already recorded partials blue.

-
Now play the second note of the desired interval on your instrument. Its partials will now appear in orange next to the blue bars.
If you now tap a bar of a partial collision, pianoscope plays the recording of both involved partials over the speaker or a connected headphone. You can now easily identify the resulting beats.
To remove the recording of the blue bars, double-tap again in the dark gray area.
Voicing
You can also use the partials view for your work on voicing hammer felts. It is advisable to select the Continuous option in order to be able to observe the progression of the partial strengths over time. If you deactivate the option Assign To Keys, the partial bars are all displayed next to each other and are wider. To get more space for the partials view on small devices, you can additionally hide the keyboard and the pitch display.

Customize toolbar (pro)
By default, the pianoscope pro toolbar contains the name of the current tuning document and the following buttons from left to right:
On iPads with iOS 16 or later, the content of the toolbar is grouped slightly differently.
-
Return to tuning document management
-
Activate indicator freezing (pro)
-
Activate tone generation (pro)
-
Mode for the automatic key selection
-
Showing the main menu
If you would like to have direct access to additional or other functions, you can customize the buttons shown in the toolbar. The following buttons are available:
-
Show/hide indicator freezing
-
Show general settings
-
Show pitch-raise settings
-
Show inharmonicity view
-
Show instrument settings
-
Show/hide on-screen keyboard
-
Show tuning curve view
-
Show/hide strobe
-
Show/hide partials
-
Start/stop tone generation
-
Show/hide complete pitch display
-
Show/hide indicator
| When tapped and held, many of the switches display a menu with extended functions. |
| The buttons for returning to document management, for automatic key selection and for the main menu are always present and cannot be removed. |
| The number of buttons you can add depends on the size and orientation of your device. Excess buttons are automatically hidden. |
To customize the toolbar, tap on Customize Toolbar in the main menu.

How the customization works depends on your device and the operating system version.
For iPads with iOS 16 or later

Drag the desired buttons from the palette directly into the toolbar. There you can also drag them into the desired order. To remove a switch again, drag it from the toolbar back into the palette. You can end the process by tapping in the background or on the Done button.
For iPads with iOS 15 and for all iPhones
On iPads with iOS 15 and on all iPhones, you can manage the buttons displayed in the toolbars in a separate list.

Tap on Add button to create another button. In the list that now appears, tap on the row with the desired button to add it.
By tapping on the handle on the right-hand side and then dragging, you can move the buttons in the list into the desired order. Buttons that are higher up in the list appear further to the right in tuning view toolbar.

To remove a button from the toolbar, swipe to the left on the corresponding row in the list and then tap Delete.
Instrument Settings
You can also reopen the instrument settings at any time via the menu.

The panel contains the same settings you already know from creating the Tuning Document.
General Settings
Via the menu you also open the panel for the general settings. These affect the entire app and are independent of the currently used tuning document.


Pitch
Here you can configure the content of the pitch display in detail and customize its display.

By default, the tuning view contains an area for displaying the current pitch.

With the main switch Pitch you can hide it completely. This is helpful if on small devices you want more space for the representation of the partials, for example to voice hammer felts.

The Tuning View can show the deviation of the current pitch from the target frequency in two different ways: As a cent scale with indicator and as a moving strobe. Here you can make settings for both display modes.
Indicator
You can use the main switch to turn the indicator display on and off. If you deactivate it, only the stroboscope display is visible.

Responsiveness
Under Responsiveness, select how quickly the indicator responds to changes in pitch when tuning. With a faster setting, you can tune more quickly, but the display is also more unsteady. The default setting is medium.

Width
Select the width of the indicator in the tuning view. With the thin width you can read the current pitch very precisely.
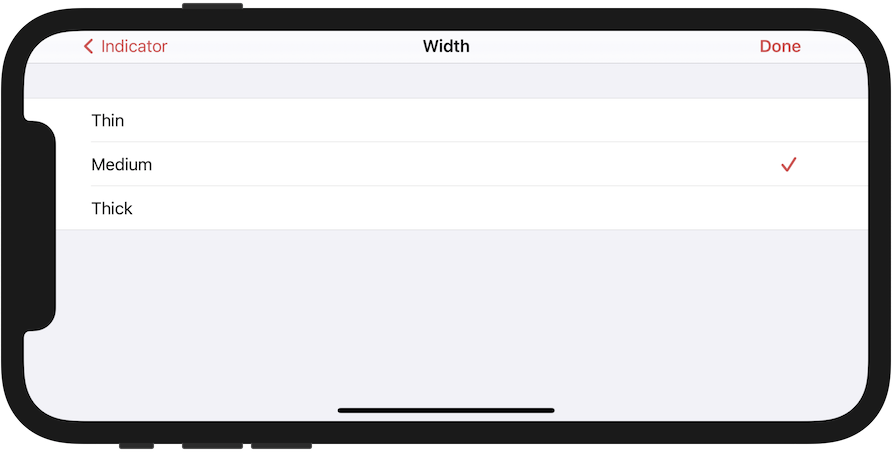
If you place the device further away or have weaker eyes, it may make sense to choose the thick width.
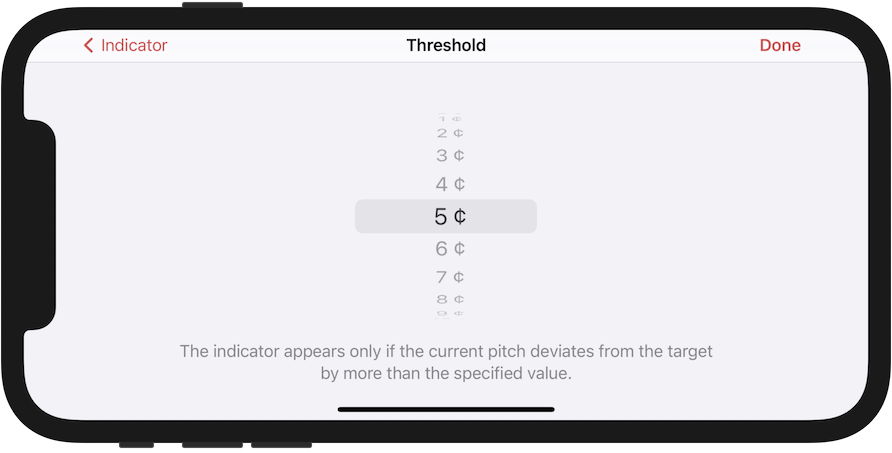
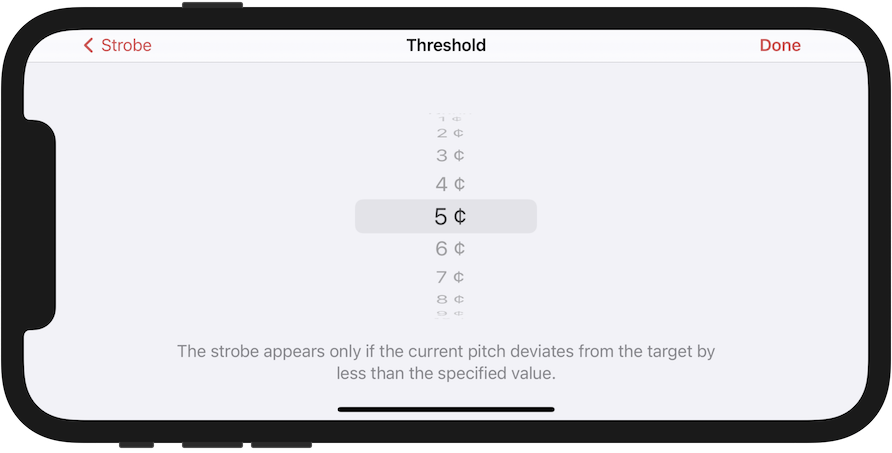
Threshold (pro)
By default, the indicator and strobe are always shown together when both display modes are enabled. However, you can also specify a threshold value for the deviation, above which the indicator is only displayed. The reverse setting is also available for the strobe. This allows you, for example, to have the indicator only visible when you are far away from the tuning target and the strobe only visible when you are close.
Scale
Here you will find all settings for pitch indicator scale.

| By tapping and holding on the scale in the tuning view, you can also access these settings directly without having to go through the main menu. |
Range
Choose between the following options for the value range of the scale:
-
± 10 ¢
-
± 20 ¢
-
± 50 ¢
-
± 100 ¢
| On iPhones with very small screens, the scale only covers the values from -80 ¢ to +80 ¢ in portrait orientation. |
| If a larger overpull is required when pitch-raising, the scale automatically switches to a larger value range. |
| A pinch gesture with two fingers inside the scale allows you to change the range directly even while tuning. |
Resolution
Choose between a variable or linear resolution.
- Variable Resolution
-
In the middle of the scale near zero, the resolution is very fine and at the edges of the scale it is coarse.

- Linear Resolution
-
The resolution is the same along the entire scale.

| In the default setting for pitch-raising, the target for over-pulling is shown above zero. The scale therefore automatically uses a linear resolution in this mode. If you set the overpull target to at zero in the scale settings, you can also choose between a linear and a variable resolution for over-pulling. |
Visibility
You can choose between three settings for the visibility of the scale:
- Show
-
The scale is always visible.
- Hide
-
The scale is not visible. Only a tick mark for the zero is shown.

- Automatic
-
If you have specified a threshold for the indicator, the scale will fade in and out together with it.
| If you have disabled the indicator, the scale will not be shown regardless of this setting. |
Text Size
All text in pianoscope automatically adapts to the size you have selected in your operating system (iOS). If you want to display the scale labels larger or smaller independently of this, choose a setting from very small to very large here.
Minor Ticks
Activate this setting so that pianoscope displays additional ticks between the large divisions of the scale. These can help to visually read the indicator position more accurately.
Overpull Target
For pitch-raising, you can select where on the scale the overpull target is displayed:
- Above Zero
-
The overpull target pitch is marked in orange right of the zero line; the original target pitch without overpull remains at zero. In this mode, the scale always uses a linear resolution when pitch-raising.

- At Zero
-
The overpull target pitch is at zero; the original target pitch is a gray marker on the left. In this mode, you can also use a scale with variable resolution during pitch-raising. Due to the high resolution around the zero, this allows you to tune precisely even while pitch-raising. You still get an intuitive sense of how much you are over- or underpulling.
Target marker
Select when the orange target marker should appear:
- Show for overpull
-
The orange target marker is only shown when overpulling above or underpulling below zero.
- Show always
-
The orange target marker is always shown even when not pitch-raising. This can help to highlight the zero more clearly.

Resolution (Pitch Raise)
If you have set the overpull target to at zero, you can also choose between a linear and a variable resolution for the pitch-raise. The variable resolution allows you to tune very precisely even when pitch-raising.
Textual Display
The Tuning View can display additional textual information at the bottom of the indicator.
-
The current frequency of the first partial of the tuned tone in Hertz. For low bass notes this can be the frequency of a virtual partial which is not actually present in the tone.
-
The deviation from the target frequency in cents.
-
The deviation from an unstretched, harmonic tuning in cents.
-
If you are using the indicator freezing, you can show the time when the indicator was frozen. This is displayed in milliseconds after the attack.
For all values you can independently choose whether they should be shown for all notes or only when tuning the concert pitch A4. The default setting shows only the frequency when tuning the concert pitch.
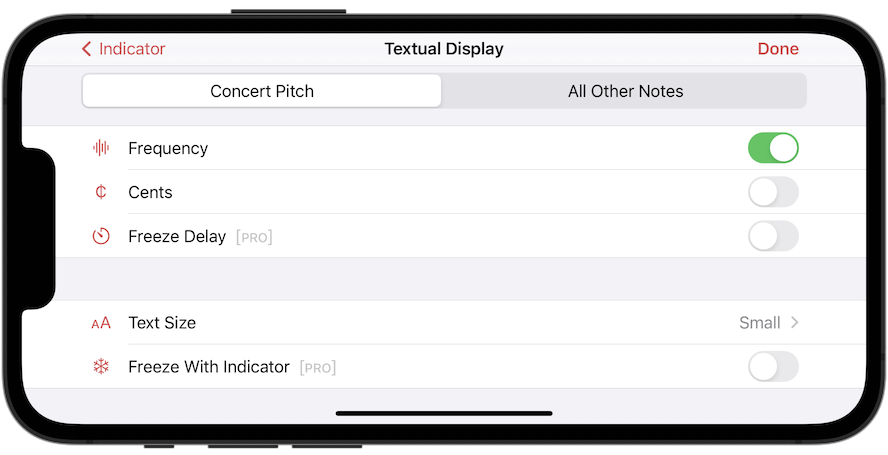
The Text Size setting allows you to adjust the font size of the textual display. The values Small, Medium and Large are relative to the text size you selected in the general system settings. The default value is Medium.
If you activate Freeze With Indicator, the textual display will also be frozen at the same position as the grey indicator. Otherwise, the text keeps moving with the red indicator and displays the associated values.
Strobe
You can use the main switch to turn the strobe on and off. If you deactivate it, only the indicator display is visible.

Contrast & Contour
Select how strongly the stroboscope stands out from the background of the scale. The default setting is medium.

Use the contour setting to determine whether the edges of the stroboscope are blurred. The default setting is soft.

This example shows the strobe with very high contrast and sharp edges:

Number Of Blocks
If your tuning hammer obscures the view of the screen from some angles, you can increase the number of moving stroboscope blocks up to five. This allows you to detect the movement of the stroboscope even if only part of the screen is visible.

Responsiveness
As with the indicator display, you can also choose between the values fast, medium and slow for the responsiveness of the strobe. The default value is fast.
Speed
The speed of the strobe represents how far the current pitch is from the tuning target. Select here how strongly this deviation translates into movement.

The strobe’s movement frequency (in revolutions per minute) results from the current deviation in cents multiplied by the selected ratio. However, the strobe will not accelerate further if the deviation is greater than the selected maximum or the frequency has already reached 400 rpm.
Threshold (pro)
By default, the indicator and strobe are always shown together when both display modes are enabled. However, you can also specify a threshold value for the deviation, below which the strobe is only displayed. The reverse setting is also available for the indicator. This allows you, for example, to have the indicator only visible when you are far away from the tuning target and the strobe only visible when you are close.
Target
Choose how you want to show the pitch of the currently selected tuning target. It is always displayed below the red note name in the tuning view.

The following settings are possible:
- None
-
The tuning target is not shown.
- Hertz
-
The target frequency of the first partial is displayed absolutely in Hertz.
- Cents
-
The target is shown in cents as deviation from an equal temperament.
- Hertz & Cents
-
Values are shown both in Hertz and cents.
Partials (pro)
Activate the switch for the Partial Spectrum to display the relative strengths of the first ten partials in the Tuning View.

Assign To Keys
By default, the partial tone bars are each assigned to a key on the keyboard based on their pitch.
If you deactivate the Assign To Keys switch, the partial bars will appear directly next to each other without being assigned to the keyboard keys.
Hide With Keyboard
If this switch is active, the partial bars are automatically hidden when you hide the keyboard, for example by double-tapping on the red name of the selected note. Deactivate the switch if you want the partials to be visible even without the keyboard.

| Without the keyboard, the partial tone bars are always arranged directly next to each other, regardless of the setting of the Assign To Keys switch. |
Display
Here you specify what information the height of the partial bars should represent.
- Continuous
-
The bar heights continuously represent the current strength of the partials.
- Hold
-
The bar heights are frozen at their respective maximum and remain there even after a note has decayed.
- Expected Values
-
The bars represent the strength of the partials they had when the inharmonicity was initially measured. If in a new tuning document you have not yet measured the inharmonicity, standard partial strengths of a typical instrument are assumed.
Compression
Depending on the setting, the strengths are not mapped linearly to the height of the bars, but are compressed so that weak partials appear stronger in relation than they are. Stronger compression makes it possible to see weak partials even on small screens.
Header (pro)
If you tune many different instruments, it can be helpful if you always keep an eye on the selected concert pitch, tuning style or temperament. To do this, you can display the settings of the current instrument in the header area of the tuning view.
Select up to three fields each for the left and right sides of the header area. To do this, tap the Add Field row for the desired side.

A list of available fields appears. Tap on a row to select the corresponding field.

iPhones hide the general system status bar in all apps in landscape mode. To keep an eye on time and battery charge while tuning with pianoscope, the fields Battery Charge and Time are available on iPhones. If you select them, they will appear in the header of the tuning view as soon as you work in landscape mode.
If you have selected multiple fields, you can also rearrange them later. To do this, tap and hold the handle at the right end of a row, and then drag it to the desired position.

To remove a header field, swipe to the left on the corresponding row and select the Delete button.

As soon as you exit the settings, the selected fields appear in the header area of the tuning view. However, Manufacturer and Model only appear if you have also entered values for them in the settings of the currently active instrument.

| The current document’s concert pitch is displayed in bold if it differs from the default value. See Make Default. |
| During the 14-day trial period, the remaining trial time will automatically appear in the header, regardless of your settings. |
Keyboard (pro)
By default, a keyboard is shown at the bottom of the tuning view, indicating the currently tuned tone. If you have turned off Automatic Key Selection, tapping the keyboard will also change the current note. If the Automatic Key Selection,swipe gestures for changing the note are good enough for you, you can hide the keyboard via the switch.

| You can show or hide the keyboard in the tuning view at any time by double-tapping on the red note name. |

Audio (pro)
Here you will find all settings to configure the sound recording and output of pianoscope.
Audio Input (pro)
Prefer Built-in Microphone
By default pianoscope uses the built-in microphone of your iPhone or iPad for recording and analyzing the played tones. If you deactivate this option, you can also use external microphones. An external microphone is not necessary to achieve a good tuning quality. However, in extremely noisy environments, an external contact microphone can help avoid interferences.
Allow Bluetooth
If you enable this option, you can also use the microphone of a Bluetooth headset. However, since the audio quality of these microphones is limited, this setting is only recommended for aural tuning with the Tone Generator.
Input Level
You can read the current level of the audio signal recorded by pianoscope from the level meter. Make sure that the peak does not reach the red area when playing piano notes, otherwise distortion will occur during recording.
Some iOS devices and external audio interfaces allow users to manually adjust the input gain of the microphone. This feature is essential for ensuring optimal audio quality, as it enables you to modify the sensitivity of the microphone to better capture the desired sound source. However, not all iOS devices or audio interfaces support gain control. If the input level slider is disabled, it means that your device or interface does not support gain adjustment.

Disable Audio Input
This setting controls when pianoscope disables the analysis of piano tones via the microphone.
- When Playing Any Audio
-
When the tone generator is running, pianoscope deactivates the microphone and no longer analyzes tones that you play on an instrument. This happens regardless of whether the generated tones are played through the built-in speaker or a headset.
- When Using Built-In Speaker
-
The microphone is only deactivated when the tone generator is creating tones through the built-in speaker. When using a headset, pianoscope continues to analyze the tones played on an instrument even when the tone generator is active. With this setting you can aurally tune instruments without visual feedback.
Tone Generation (pro)
When you tap the speaker icon in the main Voice View toolbar, pianoscope plays synthetic tones that you can use for tuning or aural training. Use the following settings to configure the playback of these tones.
Prefer Built-In Speaker
If you have no other audio device connected to your iPhone or iPad, pianoscope plays generated sounds through the built-in speaker. However, as soon as you use a headset or an external audio interface, the sounds will be played through them.
Activate this option if you want to use the built-in speaker for playback despite connected audio devices.
Allow Bluetooth
Disable this feature if you do not want pianoscope to play sounds through a connected Bluetooth headset.
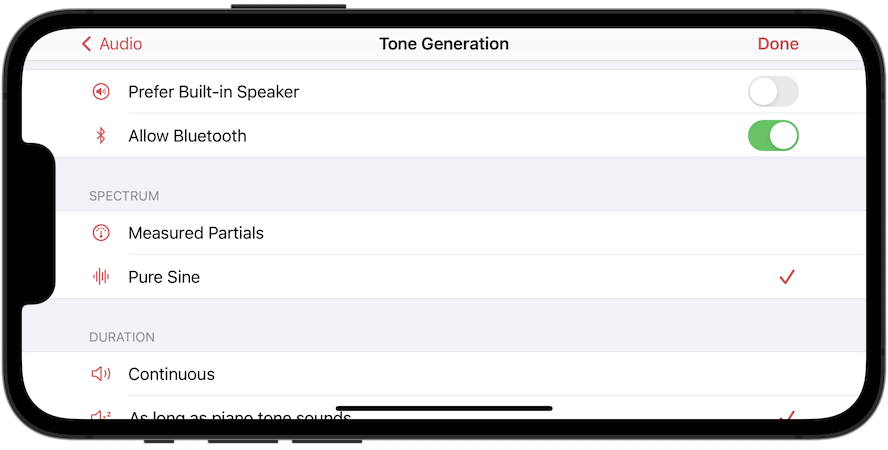
Spectrum
Here you can adjust how the spectrum of the generated tones is composed.
- Measured partials
-
Pitch, inharmonicity and partials correspond to the selected tuning curve and the characteristics determined during the inharmonicity measurement.
- Pure sine
-
Only a pure sine tone is played. Its frequency corresponds to the first partial. For low bass tones, this is a virtual partial that is not present in the actual piano sound.
Duration
- Continuous
-
When tone generation is activated, the tone generator produces a continuous tone.
- As long as piano tone sounds
-
If you use a wired or a Bluetooth headset, pianoscope detects the tone you are playing or tuning via the microphone and generates a matching target tone over the headset. With this setting, it will sound only as long as the real piano tone.
Headless Tuning
Enable this option to tune by ear using the tone generator while your device is locked. See Headless Tuning.
| You can also access the Duration and Headless Tuning settings directly via a menu in the tuning view. To open it, simply tap and hold your finger on the speaker icon in the main toolbar. |
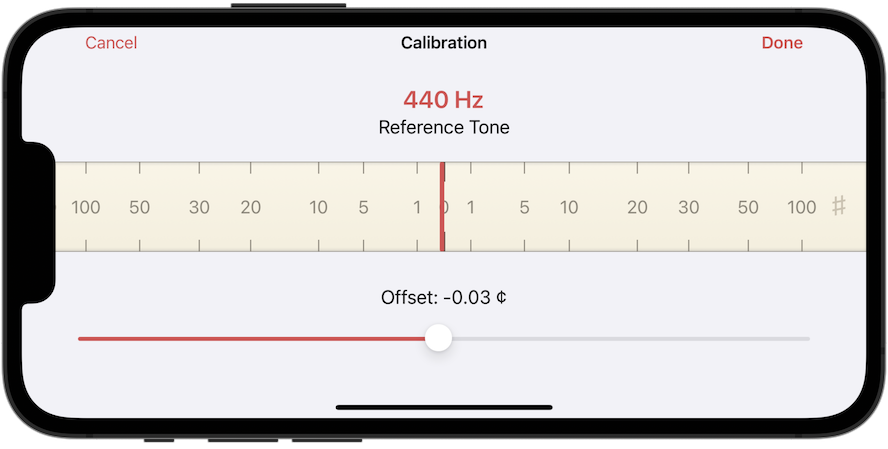
Calibration (pro)
Here you can calibrate the absolute pitch measurement in pianoscope against an external reference source. However, the audio hardware of modern iPhones and iPads has such good quality that a calibration is usually not necessary. In our tests so far we have encountered only a few devices whose absolute frequency measurement deviated by a few tenths of a cent.
For regular use absolute frequency accuracy is rather unimportant, since the perceived sound of a piano tuning depends only on relative frequency ratios. Absolute accuracy is only important when precision is required for playing with other fixed-tuned instruments.
To calibrate pianoscope you need a reliable external tone generator with a known frequency. By default, the calibration view expects a tone with 440 Hz. However, you can set other frequencies by tapping on the number.
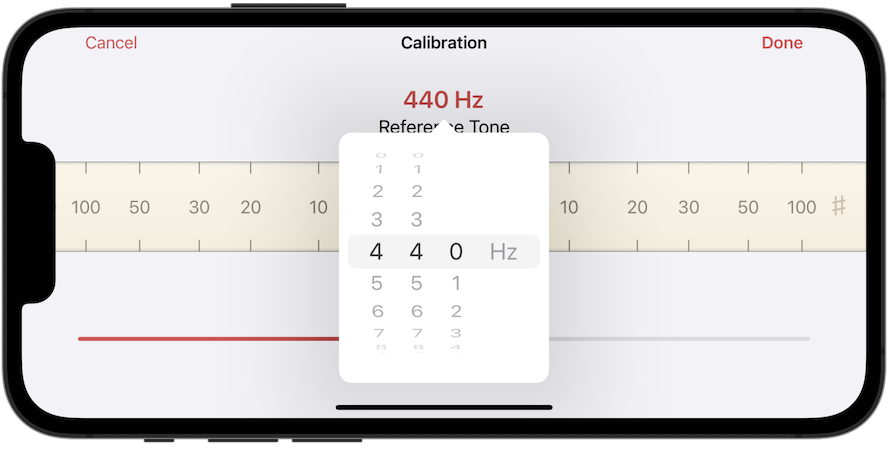
As soon as you start the external tone generator, a red indicator appears showing how much the measured frequency differs. To calibrate, move the slider carefully back and forth until the indicator is at zero.
Note Names
The way of naming notes is different in various countries. By default, pianoscope uses the most common way of the region selected on your iPhone or iPad.
In the settings for note names, however, you can also freely choose how the notes and octave numbers should be displayed.

Change Language
The user interface of pianoscope supports the following languages:
-
Czech
-
English
-
French
-
German
-
Italian
-
Polish
-
Russian
From them pianoscope selects the language that is first in the list of preferred system languages. This list can be found in the Settings app of your iPhone or iPad under General > Language & Region.

By default, this list contains only one language. However, you can add more at any time via the item Other languages … and put them in a preferred order.
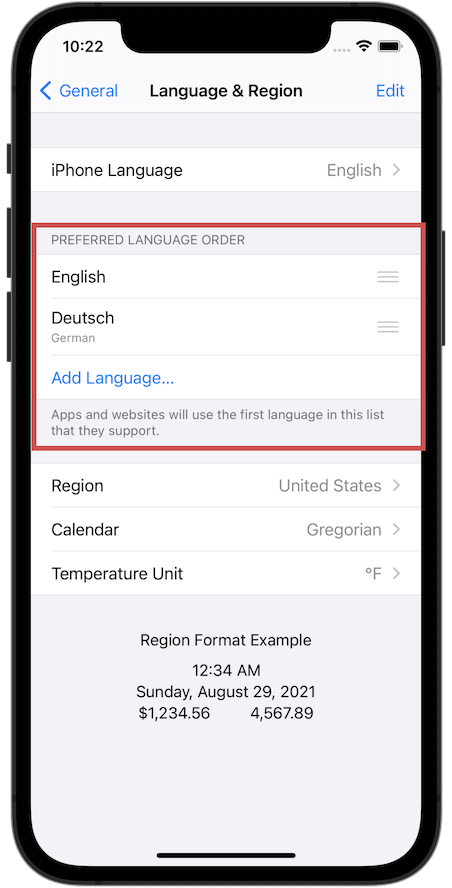
If this list contains more than one language, you can even set a desired language for each app on your device individually, also for pianoscope under Settings App > pianoscope > Language.

With the item Change Language… you can also switch directly to the system language setting from the settings in the pianoscope app.

Reset to Factory Settings
This function resets the general settings to default values. The instrument settings for the currently opened tuning document are not affected.
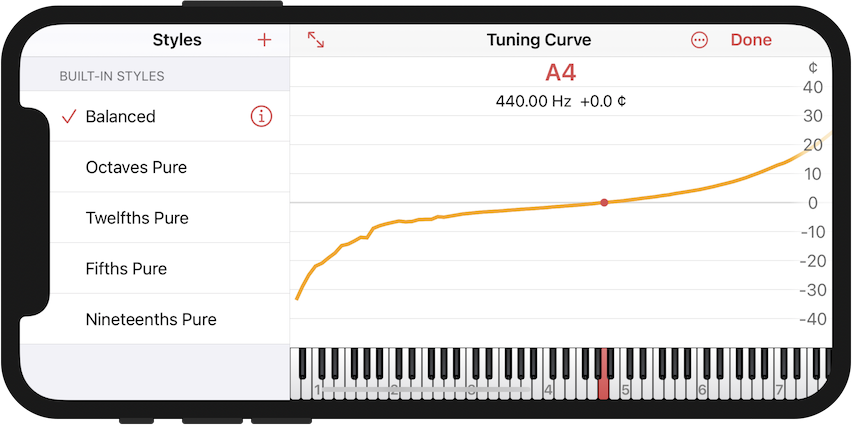
Tuning Curve (pro)
Opening Via Menu
To open the tuning curve view select Tuning Curve from the menu.
Graphical Representation
Based on the chosen tuning style and the measured inharmonicity, pianoscope calculates an individual tuning for each instrument. In this view the result of this calculation is displayed graphically as a so-called tuning curve or Railsback curve.

The curve shows for each tone in cents how much the calculated pitch deviates from an equal temperament. Since the concert pitch is fixed, it is always located on the zero line. The tuning curve shows how much pianoscope has to stretch a tuning to compensate for the inharmonicity of an instrument.
Tap a key on the on-screen keyboard to show the exact value for pitch and deviation of a tone.
| By pinching you can continuously change the width of the curve. |
Jumps and irregularities in the inharmonicity curve are also reflected in the tuning curve, as in this example.

| You can use the Curve Settings of the inharmonicity view to smooth the tuning curve if necessary. |
Tuning Styles
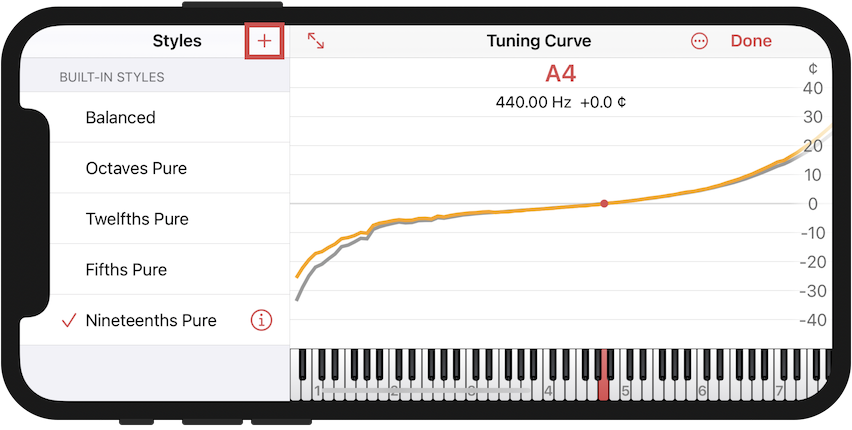
By tapping on the Styles button in the toolbar at the top left you open the list of tuning styles.

The basic styles displayed here are the same as in the Instrument Settings.
Selecting a Style
Tap on the row of a style to activate it. pianoscope immediately calculates the tuning curve for the selected style. The previous curve is displayed in grey for comparison.

Creating Custom Styles
If you want to create a custom tuning style, tap the plus symbol above the styles list and select New Tuning Style in the following menu.

Then you assign a name for the new style.
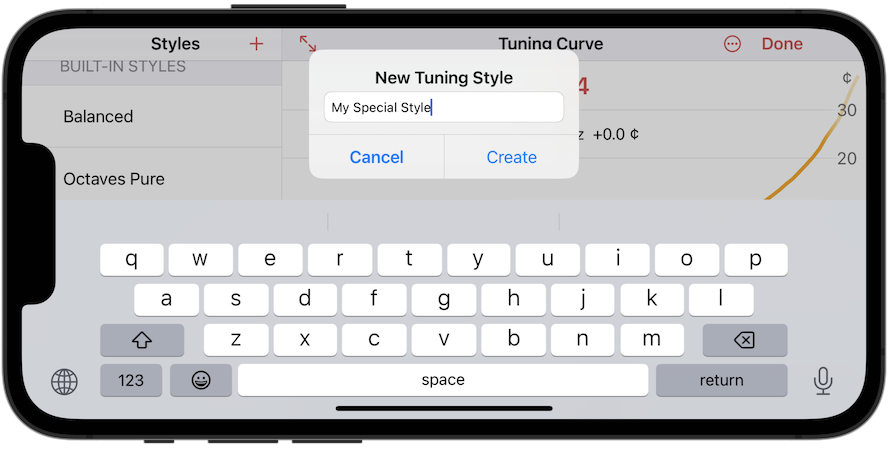
When you tap on Create, a copy of the previously selected style is created under the new name. It will now appear in a Custom Styles section at the bottom of the list.

Saving And Discarding Changes
You can edit all tuning styles, including the basic styles. See Interval Weights. A changed style is marked in the list with the gray text Edited.

If you have edited one style and then select another, pianoscope will ask you what you want to do with the changes.
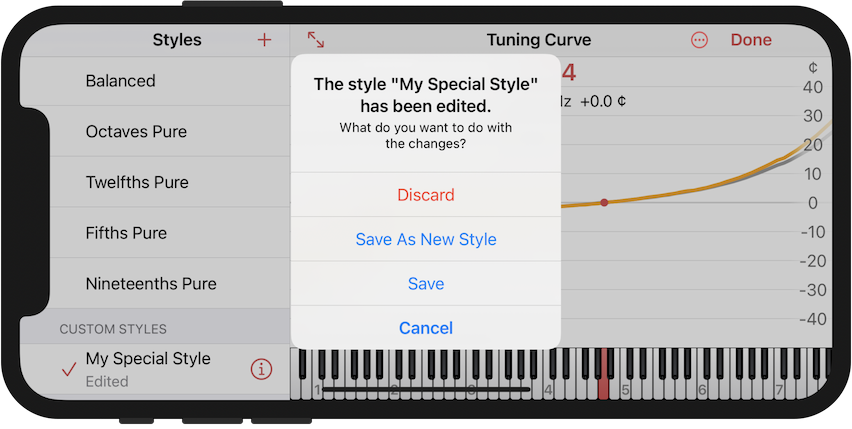
You can now discard the changes, save them or store them as a new style. Alternatively, you can also discard changes by swiping left on an edited style row and then tapping Discard Changes.

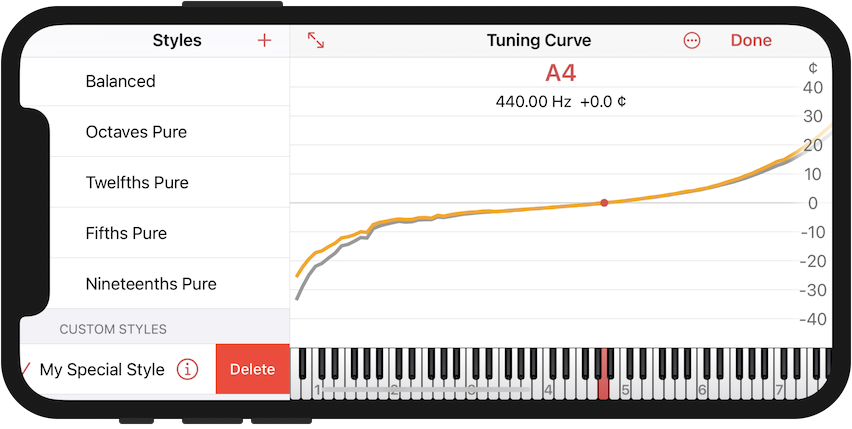
Deleting Styles
You can also delete custom styles by swiping left on the corresponding row and then tapping Delete.
Interval Weights
To edit a selected style, tap ⓘ at the right end of the row.

A list of the slow-beating intervals appears, which pianoscope considers when calculating a tuning.
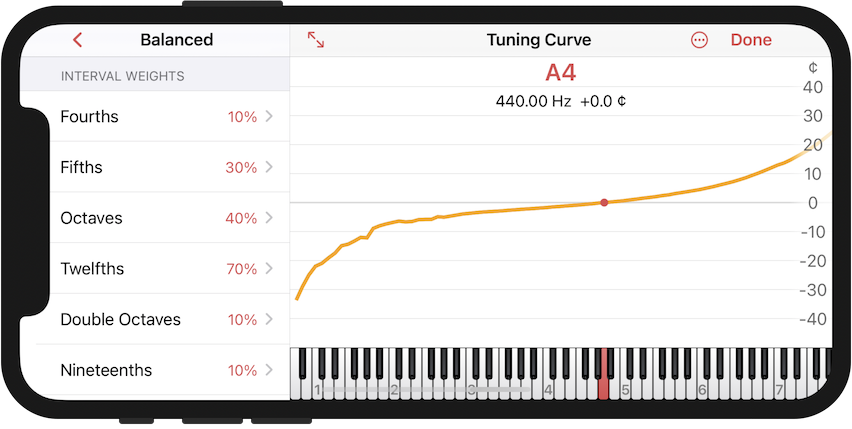
To return to the styles list, tap the red arrow in the upper left corner. The percentages next to the intervals indicate how strongly pianoscope tries to achieve purity of the corresponding interval. Intervals with higher weights are preferred over intervals with lower percentages.
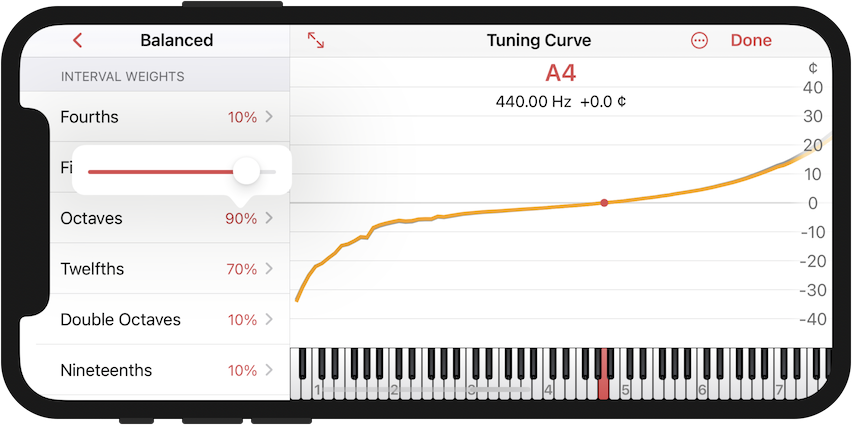
If you want to change the weight of an interval, tap on a percentage. A slider appears with which you can adjust it. The highest possible value is 100% and the lowest 1%.
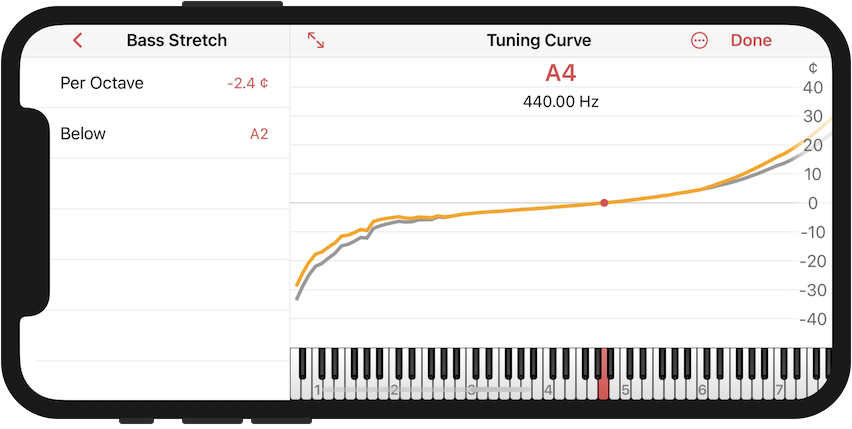
Extra Stretch
By default, the stretch of the calculated tuning is a result of the selected interval weights and the inharmonicity of the instrument. With the settings for extra stretch at the end of the list, ou can independently increase or attenuate it further.

By tapping the red number you can set by how many cents per octave you want to additionally stretch the bass and treble.
By default, the extra stretch in the bass starts at A2 and in the treble at C6. If you want to change this, tap on the row for bass or treble and edit the corresponding note in the upcoming list.
| By default pianoscope strives for pure intervals even in the high treble according to the settings of the respective tuning style. If you want an extreme stretch, where no pure intervals result in the high treble at all, you can only achieve this via the parameter Extra Stretch. |
Algorithm
Since version 2.0 pianoscope has an improved algorithm v2 for calculating tuning curves. For many instruments, it achieves a better stretch in the bass and – if desired by the tuning style – purer twelfths in the treble.
New documents created with version 2.0 automatically use the new algorithm v2. Existing documents will continue to work with v1 for compatibility reasons until you explicitly switch them to v2 here at the end of the interval list, or until you change the tuning style.

| You can tell that a document is in compatibility mode by the v1 suffix in the title bar of the tuning view. |

Show Actual Pitches
If you have already tuned the instrument once with pianoscope, you can display the last tuned pitches as points and compare them with the calculated tuning curve.
To do this, select the Show Actual Pitches item from the menu.

If you have not yet tuned the instrument, the pitches from the inharmonicity measurement will be shown.
Partial Combinations
To weight the various partial tone combinations of an interval separately, tap on an interval row. On the left-hand side a list of possible overtone combinations and their weights appears. You can also change them by selecting the percentage numbers.

| For example, what does a large weight on a 4:2 octave mean? When calculating this tuning, pianoscope tries to tune octaves as pure as possible. However, this cannot be done for all partials of a sounding interval equally well. In this example pianoscope pays special attention to the beating of the fourth partial of the lower tone of all octave intervals with the second partial of the upper interval tone. |
The weights for different intervals and partial combinations do not apply across the entire scale. The darker the Deviation Curves are in the chart on the right-hand side, the stronger is the effect of an interval weight in this range. Weights on 8:4 octaves, for example, have an effect mainly in the bass range, while those on 2:1 octaves work mainly the tenor and treble. The exact progression is individual for each instrument and results from the strengths of the first ten partials measured together with the inharmonicity.
Different partial intervals thus also have a different effect on the stretch of the tuning curve. For example, a large weight on a 2:1 octave reduces the overall stretch, whereas a large weight on a 10:5 octave increases the stretch particularly in the bass.
Selecting a Single Partial Combination
If you tap on the line of a partial combination, the chart is reduced to a single deviation curve.

The table on the left shows the following values:
- Weight
-
This is the relative weight of the interval as set in the previous dialog.
- Maximum
-
The note where the interval is most strongly weighted. It corresponds to the point where the tint of the curve is darkest.
Deviation Curves
If you select an interval in the left list, the right side shows the so-called deviation curves. They indicate how much the frequencies of the respective partials in the interval deviate from each other. The closer a curve is to the zero line, the less beating will be audible for the corresponding partial combination in this range. The deviations are always mapped to the lower tone of an interval in the curves.
In this example you can see that the 4:2 octaves are tuned almost pure in their central range, while the 2:1 octaves are about 2 cents wider.
| As you change the weights of an interval, the deviation curves adjust live so that you can directly assess the effect. |
Show Tuning Curve
If you would like to see the tuning curve together with the deviation curves, select the item Show Tuning Curve from the menu.

Since the stretch of the tuning curve is much stronger than the deviations in the individual intervals, it has its own scale in this view. The orange scale applies to the tuning curve and the black scale to the deviation curves.

To display the deviation curves of several interval types simultaneously, swipe to the left on the desired row in the interval list and select Show Deviations.
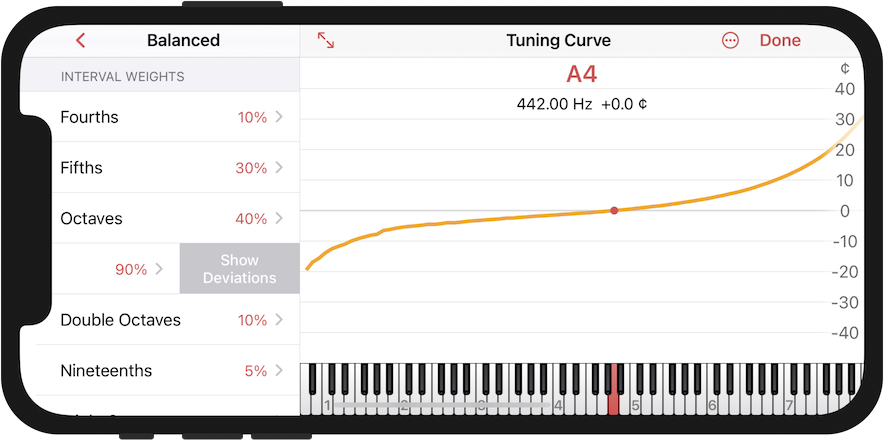
The interval name will then be shown in bold and the selected curves will always remain visible, even if you switch to the level of other intervals. To hide the curves again, swipe left and select Hide Deviations.

Relative / Absolute Weights
The blue tint of the deviation curves indicates how strong the selected weight of an interval is in the respective tone range. By default this is meant relative to the maximum of each curve. If you want to compare the weights of different curves graphically, you can also switch the coloring to absolute weights. To do this, select the item Absolute weights in the menu.

Deviation / Beat Frequency
By default, the curves show the deviation from pure intervals in cents. You can also use them to show the beat frequency. It is obtained as the direct difference of the frequencies of the respective partials. To switch, select the Beat Frequency item in the menu.

Static Tunings
As an alternative to the dynamically calculated tuning curves, you can record the current tuning of an instrument as a so-called static tuning. Static tunings are an excellent way to save aural tunings and restore them later.
Recording a static tuning
To record a static tuning, tap the plus symbol above the style list and select New Static Tuning in the following menu.

After that, assign a name for the new static tuning.

To record the tuning, now follow the prompt and play all the notes marked in red one after the other for one second each until they turn green.

| For the best result, you should measure all notes of the instrument. If you skip notes, their pitch will be interpolated from the recorded values of the neighboring notes. |
When you are satisfied with the measurement, tap the Done button in the upper right corner.

The recorded static tuning appears below the tuning styles in its own group.

| Static tunings are individual to an instrument and are therefore stored in the tuning documents. |
Restoring a static tuning
To restore a static tuning at a later time, simply select it from the list by tapping on it, just like a tuning style. If the concert pitch recorded in the static tuning differs from the currently set concert pitch, pianoscope will ask you to choose one of the two pitches.

Now you can use all the functions to tune the instrument as with a dynamic tuning style.
| You can also use static tunings to copy an aural tuning from one instrument to another, like for piano duets. Be aware that when you apply a static tuning to an instrument of different size or inharmonicity, the tuning indicator can be more unsteady as pianoscope regards multiple partials to determine the pitch. |
Editing a static tuning
You can also edit the recordings of individual notes of a static tuning afterwards. To do this, swipe to the left on the row of a static tuning and select the item Edit.

You will now be taken back to the recording dialog. By tapping on the measuring button in the upper left corner you start the recording and can now record further notes or replace existing ones with new recordings.

When you are satisfied with the measurement, tap the Done button in the upper right corner.
Renaming
If you want to change the name of a static tuning, swipe to the left on its row and select the item Rename. Enter a new name in the following dialog.
Deleting
If you want to delete a static tuning, swipe to the left on its row and select the Delete item.
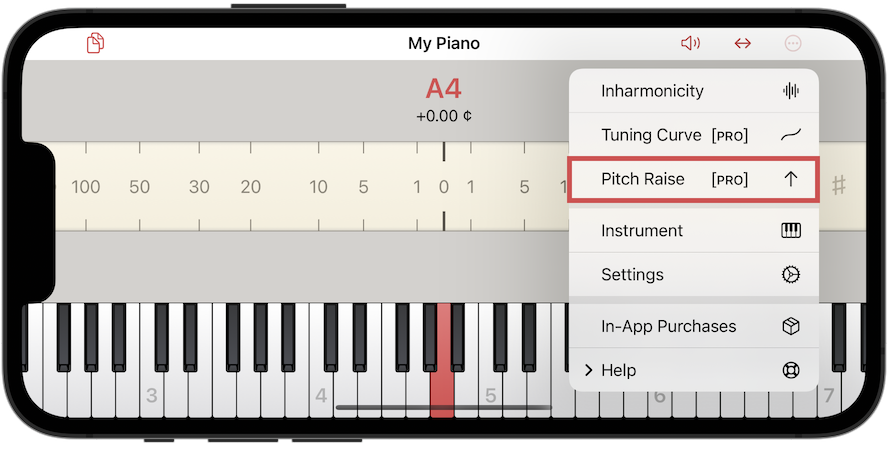
Pitch Raise (pro)
Basics
The cast frame of a piano can bear up to 20 tons of force. If an instrument is not tuned for a long time, this force decreases significantly and the tuning goes flat. When the pitch is raised again, the soundboard and plate deform, so that the pitches of strings that have already been tuned immediately drop again. The strings themselves also take a while to adjust to the new tension. This makes it difficult to reach the tuning target in a single pass.
If pianoscope knows the current tuning of a piano, it can calculate how much you need to overpull the actual tuning target to compensate for the interaction of soundboard, frame and strings. This means that a single pass is sufficient for a coarse tuning. A fine-tuning pass can be performed independently of the pitch raising after a couple of days.
| If a piano has only dropped by 10 cents, it can already be worthwhile to overpull the tuning with the automated pitch raising of pianoscope. |
Start
You start the automatic pitch raising via the item Pitch Raise in the
-menu.
Settings
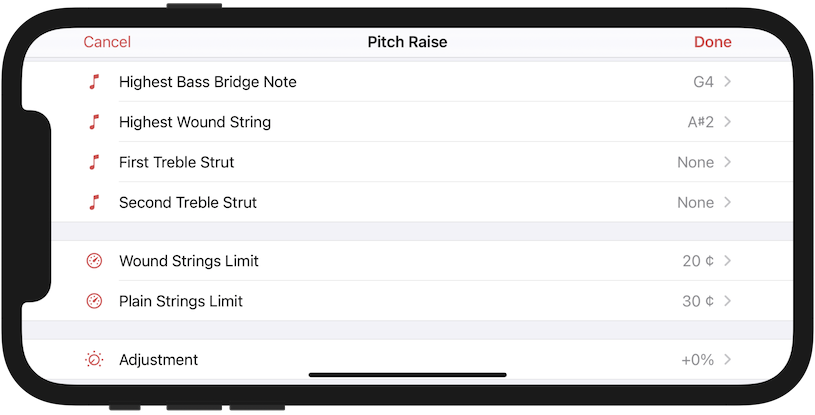
To calculate the overpull, pianoscope first needs the following information about the instrument:
- Highest Bass Bridge Note
-
Here you specify which is the highest tone whose strings still run over the bass bridge. The default setting is A#2, but this differs greatly between pianos.
| If you tap on the piano symbol in the upper right corner, pianoscope will recognize and adopt the desired note when you play it on the piano. Of course, this only works if the tuning is not more than 50 cents flat. This mode remains active for the following settings or for the next pitch raise until you switch it off again by tapping on the keyboard symbol. |

Tap Continue to advance to the next setting. By tapping on the flag symbol, you can skip all the following settings and directly start measuring the current tuning.
- Highest Wound String
-
Here you specify the note of the highest strings which are still wound. The default setting is A#2, but this differs greatly between pianos.
- First Treble Strut
-
Here you specify the note that lies directly below the first plate strut in the treble. Due to their stiffness, these struts reduce the interaction of the adjacent strings. If you specify their position, pianoscope can take this effect into account. Without specifying it, the calculation usually yields too high overpull values for the notes directly below the strut.
- Second Treble Strut
-
Here you specify the note that lies directly below the second treble strut, which most grand and some upright pianos have. This works analogously to the first strut.
- Wound Strings Limit
-
The calculation does not overpull wound strings by more than this amount to protect them from breaking. The default value of 20 cents is a good safe limit for many pianos.
- Plain Strings Limit
-
The calculation does not overpull unwound strings by more than this amount to protect them from breaking. The default value of 35 cents is a good safe limit for many pianos.
- Adjustment
-
With this percentage value you can manually increase or decrease all overpull values calculated automatically by pianoscope. The security limits are taken into account. In most cases, you do not need to change the default setting of 0%.
When the last setting is complete, tap Continue in the upper right corner of the toolbar.
Measuring the Current Tuning
Before pitch raising can really start, pianoscope must measure the current tuning of the instrument. For this you play the marked notes for one second each as samples. The procedure is similar to measuring the inharmonicity. By default, pianoscope marks every major second starting from the lowest note.

This provides a very good estimate of the current tuning state for most instruments. If you want to measure more or fewer notes, you can select a different note pattern using the note symbol in the main toolbar:
-
All A’s
-
A-minor triad
-
Minor thirds
-
Major seconds
-
All black keys
-
All white keys
-
All keys

If an instrument is very unevenly out of tune, it is worth measuring as many notes as possible, for example with the patterns All white keys or All keys. If the instrument is very evenly out of tune, you can choose a pattern with fewer notes to save some time.
For each measured note, a point is added to the diagram above the keyboard. It indicates the deviation from an equal temperament. For comparison, the pitches of the intended tuning are shown in grey.

When you have finished measuring, tap on Done in the toolbar to start the actual tuning.
Simultaneous Measurement of Inharmonicity
If you have not previously determined the inharmonicity separately, it is automatically recorded in the background during the measurement. The recording then takes about half a second longer for each note.
To check the measured inharmonicities, simply swipe upwards or downwards in the diagram.

Swipe again to return to showing the pitches. During the measurements, you can switch back and forth between the two views as desired.
Pitch raising directly after measuring the inharmonicity
If you have just measured the inharmonicity, you can save time when determining the tuning state by carrying over the measured values. pianoscope will inform you of this with a dialog. Of course, you must not have changed the tuning since the measurement.

To adopt the measured values tap on Use existing measurement. pianoscope will then mark any missing notes on the on-screen keyboard and ask you to play them. Usually these are only a few keys like in this picture.

Tuning With Overpulling
In order for the strings, soundboard and plate to move as calculated, you must tune the piano in a fixed order from bottom to top - from A0 to C8. You also tune the associated unisons as you go. In pitch-raise mode, the scale now shows an individual overpull marker for each note, which is located above middle zero. Instead of tuning to zero, you now tune to the marker to overpull the strings as calculated.

When pitch raising, the scale is linear because the target is no longer in the middle. Thus, the scale is accurate enough for a coarse pitch raise, even in the outer areas.
Alternatively, you can also use a scale with variable resolution during pitch-raising for very precise tuning. To do this, you need to set the Overpull target setting for the pitch-scale to At zero. The target pitch is then always at zero, and the original pitch is represented by a gray marker to the left of zero.
More Functions
While pitch raising, the corresponding item in the -menu will appear in red to indicate that you are in pitch raise mode.

When you select the red menu item, a submenu opens with additional functions.

With the first item End you leave the pitch raise mode. If you were in the middle of a tuning, you can restart it at any time via the Resume item. However, make sure that you continue tuning with the note you left off with.

With the menu item New Pitch Raise you start a pitch raise with a new measurement.
Via the item Measurements you can view the results of the last measurement again at any time.

Via the menu item Settings you can change the settings before the next pitch raise up of the instrument.
You can change these settings at any time. But remember that this is usually not useful in the middle of a tuning. A warning dialog will alert you in this case.

Pitch Lowering
Contrary to its name, you can also use the Pitch Raise function to lower instruments that are too sharp. Proceed in the same way as described above for pitch raising. pianoscope now shows markers in the tuning view that are below the actual tuning targets.
Generate Tones (pro)
pianoscope can also produce tones itself – through the built-in speaker or headphones. These tones help you, for example, to quickly chip-tune an instrument when it is restringed. You can also use them to train your ears for the inharmonic partial structure of a piano sound. With the tones played through headphones, it is even possible to tune an instrument aurally without visual feedback.
Tone Generation Via Loudspeaker
You start the tone generation by tapping the speaker icon in the main toolbar.

If you do not have a headset connected to your device, pianoscope now plays a continuous, synthetic tone. Its pitch, inharmonicity and partial strengths will correspond to the selected tuning curve and the characteristics determined during the inharmonicity measurement. Alternatively, if you prefer a pure sine tone, you can change this via the Settings.
To change the tone, simply select another key on the on-screen keyboard, or swipe & tap in the tuning scale.
| While tone generation is running through the built-in speaker, pianoscope does not analyze sounds - the microphone is turned off. |
| During a pitch raise, the generated pitch takes the calculated overpull or underpull into account. |
As long as the sound generation is active, the speaker symbol in the function bar appears filled with color.
To stop sound generation, tap the speaker icon again.

Tone Generation via Headphones
When using headphones, the tone generator is now automatically reacting to notes played on an instrument and adjusts the generated pitch accordingly. This enables a novel way of electronically assisted tuning or training in which the tuner simply aurally matches the current pitch to the guiding tone played by pianoscope, similar to aurally tuning unisons.
If you tap the speaker icon while holding your finger down, a menu appears with more settings for the tone generator. If you activate the option As long as piano tone sounds, tones are only playing while you are actually tuning a note
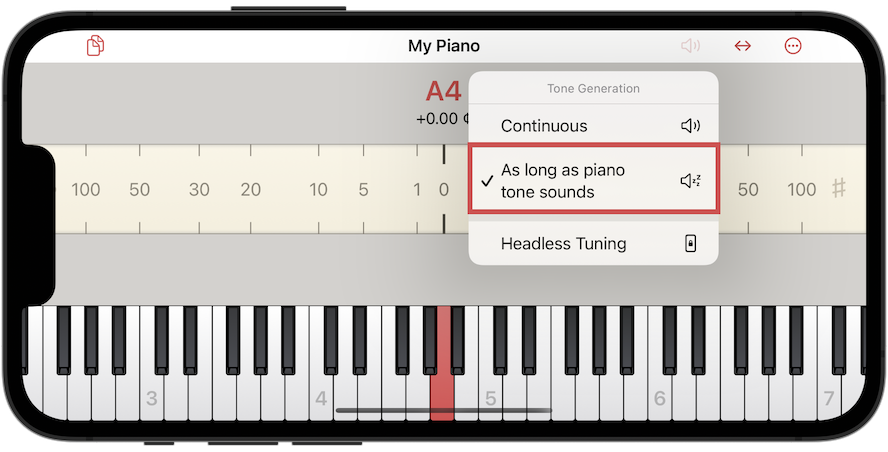
To respond to the notes you play on the instrument, pianoscope uses either the microphone built into your device or the microphone on your headset. You can select this in the Audio Settings.
| You can also turn the tone generator on and off using the start/stop button on your headset. |
Headless Tuning
With the Headless Tuning option, you can even aurally tune with the tone generator while your device is locked, since a visual display is no longer required.

For headless tuning, make sure the option is selected and you have activated the tone generator (the speaker icon is filled red). Now, if you exit the pianoscope app or even lock the screen, the tone generator will continue to run and respond to the notes you play on the instrument.
| If you no longer want pianoscope to work in the background, simply stop the sound generation using the remote control on your headset or the speaker icon in the app. |